Toyota Corolla (E120): Overhaul
1. Remove bench type rear seat cushion assy
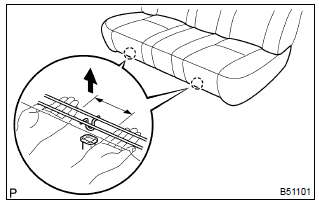
- Disengage the 2 clamps, and then remove the seat cushion.
2. Remove separate type rear seat back assy
- lean the seat back forward.
- remove the 2 clips.
- remove the 2 bolts and seat back lh.
- employ the same manner described above to the other side.
3. Remove bench type rear seat cushion cover
- remove the hog rings and seat cushion cover.
4. Remove separate type rear seat back cover
- remove the hog rings, and then turn up the seat back cover lh.
- remove the headrest supports, seat back cover lh and seat back pad lh.
- employ the same manner described above to the other side.
5. Install separate type rear seat back cover
- install the seat back pad lh to the seat back frame lh.
- cover the top of the seat back with the seat back cover lh.
- install the headrest supports.
- using hog ring pliers, fully install the seat back cover lh with new hog rings.
- employ the same manner described above the other side.
6. Install bench type rear seat cushion cover
- using hog ring pliers, install the seat cushion cover with new hog rings.
7. Install separate type rear seat back assy
- install the seat back lh with the 2 bolts and 2 clips.
Torque: 18 nvm (185 kgfvcm, 13 ftvlbf)
- employ the same manner described above to the other side.
8. Install bench type rear seat cushion assy
- insert the seat cushion under the seat back.
- engage the 2 clamps.


Other materials:
Pressing power switch does not start system
Wiring diagram
Inspection procedure
1 Inspect radio receiver assy(+b, acc, gnd)
Check that the continuity between terminals at each
condition, as shown in the chart.
Standard:
Check that the voltage between terminals at each condition,
as shown in the chart.
Standard:
...
Inspection procedure
1 Check hazard warning signal switch assy
Check the hazard warning switch continuity, as shown in
the illustration and table.
Standard:
2 Check turn signal flasher assy
3 Check wire harness (tvip ecu turn signal flasher)
Disconnect the tvip ecu and turn signal flashe ...
Overhaul
1. Remove oil filler cap sub–assy
Remove the oil filler cap from the cylinder head cover.
2. Remove oil filler cap gasket
Using a screwdriver, remove the gasket from the oil filler
cap.
3. Remove ventilation valve sub–assy
Remove the ventilation valve from the cyl ...