Toyota Corolla (E120): Noise occurs
Inspection procedure
1 Check of speaker installation
- Check speaker installation condition.
- Check that each speaker is securely installed.
Standard: malfunction disappear.
Hint
: the radio is equipped with noise prevention system that does not work against the regular use of the radio, thereby excessively large noise cannot occur in the radio. If large noise occurs, check whether or not the earth on the antenna installation part and the proper noise–prevention equipment are all installed, and whether or not the improper wiring is held.
Hint
:
- identify the condition under which the noise occurs, and check the noise filter on the related part.
- Make sure first that there is no noise from outside. Failing to do so makes the noise occurrence source detection impossible and leads to misunderstanding.
- The noise should be removed in descending order of loudness.


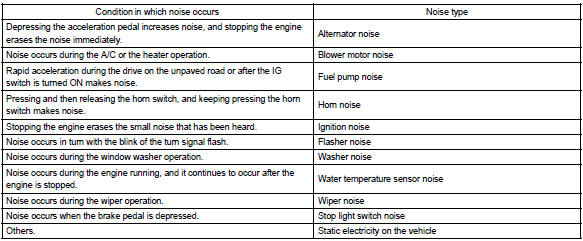
Identification of noise source


Other materials:
Parking the vehicle
► Automatic transmission or continuously
variable transmission Automatic transmission or continuously variable transmission
1 With the shift lever in D, depress the brake pedal.
2 Shift the shift lever to P.
3 Set the parking brake.
4 Vehicles without a smart key system: Turn ...
Driving support system
information display
■ Driving support system
information
Select to display the operational
status of the following systems:
LTA (Lane Tracing Assist)
LDA (Lane Departure Alertl)
Dynamic radar cruise control
■ Navigation system-linked
display (if equipped)
Select to display the following
navigation system-linke ...
How to proceed with troubleshooting
Hint:
troubleshooting of the wireless door lock control system is based on
the premise that the power door
lock system is operating normally. Therefore, before troubleshooting the
wireless door lock control system,
first make certain that the the power door lock system is operating
...