Toyota Corolla (E120): Circuit description
Shifting from 1st to o/d is performed in combination with on and off of the shift solenoid valve s1 and s2 controlled by ecm. If an open or short circuit occurs in either of the solenoid valves, the ecm controls the remaining normal solenoid valve to allow the vehicle to be operated smoothly (fail safe function).
Fail safe function: if either of the solenoid valve circuits develops an open or short, the ecm turns the other solenoid valve on and off to shift to the gear positions shown in the table below. If both solenoids malfunction, hydraulic control cannot be performed electronically and must be done manually.
Manual shifting as shown in the above table must be done (in the case of a short circuit, the ecm stops sending current to the short circuited solenoid).
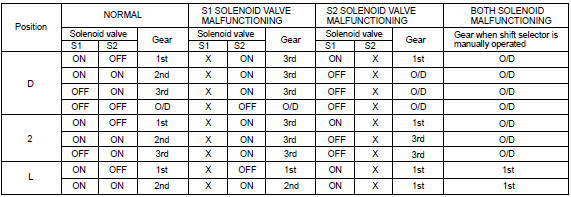
X: malfunctions

Monitor description
The ecm commands gearshift by turning the shift solenoid valves ”on/off”. When there is an open or short circuit in any shift solenoid valve circuit, the ecm detects the problem and the mil comes on. Illuminating the mil, the ecm performs the fail–safe and turns the other shift solenoid valves in good condition ”on/off” (in case of an open or short circuit, the ecm stops sending current to the circuit.).
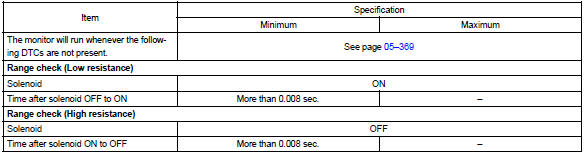
Monitor strategy

Typical enabling condition
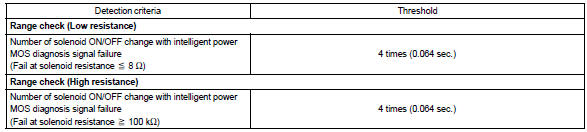
Typical malfunction thresholds
Component operating range

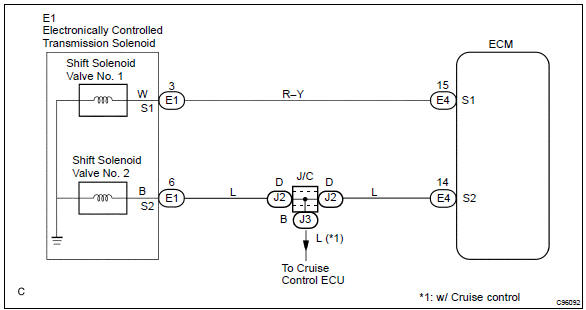
Wiring diagram


Other materials:
Circuit description
The p squib circuit consists of the airbag sensor assy center and instrument
panel passenger airbag assy.
It causes the srs to deploy when the srs deployment conditions are satisfied.
Dtc b0105/53 is recorded when a short is detected in the p squib circuit.
Wiring diagram
...
Check mode procedure
Hint:
hand–held tester only:
compared to the normal mode, the check mode has more sensing
ability to detect malfunctions. Furthermore, the same diagnostic
items which are detected in the normal mode can also be
detected in the check mode.
1. Check mode procedure(using the hand–held tester) ...
Fuel pump shut off system
To minimize the risk of fuel leakage when the engine stalls or when an airbag
inflates upon collision, the fuel pump shut off system stops the supply of fuel
to the engine.
Follow the procedure below to restart the engine after the system is activated.
► Vehicles without a smart key syst ...