Toyota Corolla (E210) 2019-2025 Owners Manual / Maintenance and care / Engine compartment / Checking the engine coolant
Toyota Corolla (E210): Checking the engine coolant
The coolant level is satisfactory if it is between the "MAX" and "MIN" lines on the reservoir when the engine is cold.
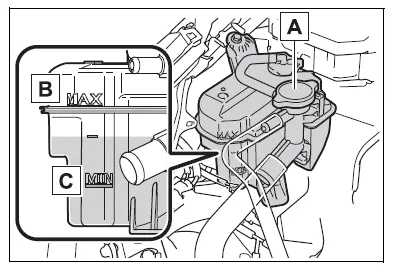
- Reservoir
- "MAX" line
- "MIN" line
If the level is on or below the "MIN" line, add coolant up to the "MAX" line.
■Coolant selection
Only use "Toyota Super Long Life Coolant" or a similar high quality ethylene glycol based non-silicate, non-amine, non-nitrite, and non-borate coolant with long-life hybrid organic acid technology.
For the U.S.A.:
"Toyota Super Long Life Coolant" is a mixture of 50% coolant and 50% deionized water. (Minimum temperature: -31ºF [-35ºC] )
For Canada:
"Toyota Super Long Life Coolant" is a mixture of 55% coolant and 45% deionized water. (Minimum temperature: -44ºF [-42ºC] )
For more details about coolant, contact your Toyota dealer.
■If the coolant level drops within a short time of replenishing
Visually check the radiator, hoses, engine coolant reservoir caps, drain cock and water pump.
If you cannot find a leak, have your Toyota dealer test the cap and check for leaks in the cooling system.
WARNING
■When the engine is hot
Do not remove the engine coolant reservoir cap.
The cooling system may be under pressure and may spray hot coolant if the cap is removed, causing serious injuries, such as burns.
NOTICE
■When adding coolant
Coolant is neither plain water nor straight antifreeze. The correct mixture of water and antifreeze must be used to provide proper lubrication, corrosion protection and cooling. Be sure to read the antifreeze or coolant label.
■If you spill coolant
Be sure to wash it off with water to prevent it from damaging parts or paint.
Checking the radiator and condenser
Check the radiator and condenser and clear away any foreign objects. If either of the above parts is extremely dirty or you are not sure of their condition, have your vehicle inspected by your Toyota dealer.
WARNING
■When the engine is hot
Do not touch the radiator or condenser as they may be hot and cause serious injuries, such as burns.


Other materials:
Removal & installation and disassembly & reassembly
1. Remove bench type rear seat cushion assy
2. Remove rear floor service hole cover
Remove the rear service hole cover.
Disconnect the fuel pump and vapor pressure sensor
connector.
3. Work for preventing gasoline from spilling out
Start the engine.
after the engi ...
Windshield wiper switch assy
Replacement
1. Remove steering column cover lwr
Remove 3 screws and steering column cover lwr.
2. Remove windshield wiper switch assy
Disconnect the connecter of the windshield wiper switch.
release the claw and pull out the windshield wiper switch
assy as shown in the ...
Precaution
Caution:
replace the faulty parts of the seat belt systems (outer belt, inner belt,
bolts, nuts, adjustable shoulder
anchor, tether anchor hardware, sill–bar, etc.).
Seat belt systems not in use at the time of a collision should also be inspected
and replaced if found
to be damaged or wo ...