Toyota Corolla (E170) 2014–2019 Owners Manual / Interior features / Using the audio system
Toyota Corolla (E170): Using the audio system
Optimal use of the audio system
Sound quality (treble/bass) and volume balance can be adjusted.
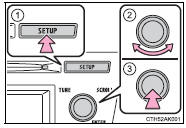
1 Displays the current mode 2 Changes the following setting • Sound quality and volume balance
The sound quality and balance setting can be changed to produce the best sound.
• Automatic Sound Levelizer on/ off
3 Selects a mode
Using the audio control function
■ Changing sound quality modes
1 Press  .
.
2 Turn  to select “Sound Setting”.
3 Press  .
.
4 Turn  to select the desired mode.
“BASS”, “TREBLE”, “FADER”, “BALANCE”, or “ASL” 5 Press
 .
.
■ Adjusting sound quality
Turning  adjusts the level.
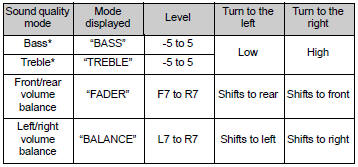
*:The sound quality level is adjusted individually in each audio mode.
■ Adjusting the Automatic Sound Levelizer (ASL)
When ASL is selected, turning  to
the right changes the amount of ASL in the order of “LOW”, “MID” and “HIGH”.
to
the right changes the amount of ASL in the order of “LOW”, “MID” and “HIGH”.
Turning  to the left turns ASL off.
ASL automatically adjusts the volume and tone quality according to the vehicle speed.


Other materials:
Clock assy
Replacement
1. Remove console panel upper
2. Remove heater control knob
3. Remove instrument cluster finish panel
4. Remove clock assy
Using a screwdriver, disengage the 4 claws, remove the
clock as shown in the illustration.
Hint:
tape the screwdriver tip before use. ...
Checking monitor status
Hint:
”monitor result” indicates normal or malfunction of each
component and system when judgment has done.
1. How to read data
Connect the hand–held tester to the dlc 3.
enter ”monitor result” from ”diagnosis / enhanced
obd ii / monitor info / monitor result”
on ...
Front suspension arm sub–assy lower no.1 Lh
Replacement
Hint: components:
1. Remove front wheel
2. Disconnect front stabilizer link assy lh (lh (a/t) position)
3. Disconnect front stabilizer link assy rh (lh (a/t) position)
Hint:
remove the rh side by the same procedures as the lh side.
4. Separate front suspension arm sub–assy lowe ...