
Toyota Corolla (E120): Check short circuit
- If the wire harness is ground shorted as shown in fig. 5, Locate the section by conducting a resistance check with the body ground in step (b).
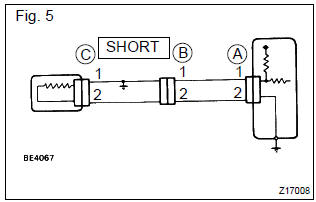
- Check the resistance with the body ground.
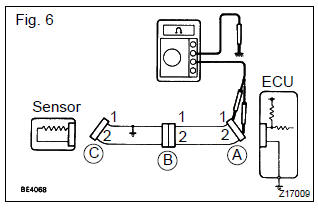
- Disconnect connectors a and c and measure the
resistance between terminals 1 and 2 of connector
a and the body ground.
Resistance: 10 kΩ or higher
Hint
: measure the resistance while lightly shaking the wire harness vertically and horizontally. In the case of fig. 6: Between terminal 1 of connector a and body ground " below 1 Ω
between terminal 2 of connector a and body ground " 10 kΩ
or higher therefore, the cause is a short circuit between terminal 1 of connector a and terminal 1 of connector c.
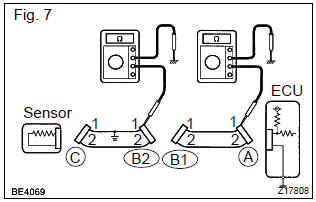
- Disconnect connector b and measure the resistance
between terminal 1 of connector a and the
body ground, and terminal 1 of connector b2 and
the body ground.
In the case of fig. 7: Between terminal 1 of connector a and body ground " 10 kw or higher between terminal 1 of connector b2 and body ground " below 1 w therefore, the cause is a short circuit between terminal 1 of connector b2 and terminal 1 of connector c.


Other materials:
Trailer towing
Toyota does not recommend
towing a trailer with
your vehicle. Toyota also
does not recommend the
installation of a tow hitch or
the use of a tow hitch carrier
for a wheelchair, scooter,
bicycle, etc. Your vehicle is
not designed for trailer towing
or for the use of tow
hitch mounted carriers.
Dingh ...
On–vehicle inspection
1. Check cooling fan operation with low temperature (below 83 c (181 f))
Turn the ignition switch on.
check that the cooling fan stops.
Hint:
if not, check the cooling fan relay and water temperature sensor, and check for
separated connector or severed
wire between the cooling fan ...
Editing the contact data
For PBAP compatible Bluetooth® phones, this function is available when “Automatic
Contact/History Transfer” is set to off. 1 Select “Edit Contact”.
2 Select the desired contact.
3 Select corresponding to the desired name or number.
► For editing the name
Follow the steps in “R ...