Toyota Corolla (E120): Overhaul
Caution
: wear the gloves, because the cutting surface of the seat back frame and seat adjuster may injure your hand.
Hint
: tape the screwdriver tip before use when prying parts.
1. Disconnect battery negative terminal
Caution
: wait for 90 seconds after disconnecting the battery terminal and disconnect the airbag connector.
2. Remove front seat
- remove the headrest.
- remove the seat track covers and 4 bolts.
- slide the seat to the most rear position.
- disconnect the connector(s) under the seat.
- remove the seat.
Notice
: be careful not to damage the body.
3. Remove separate type front seat back assy
- remove the bolt, washer and seat belt inner.
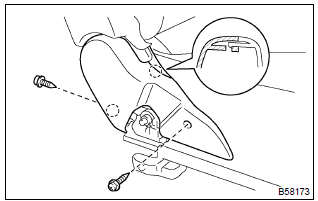
- Remove the seat cushion shield inner.
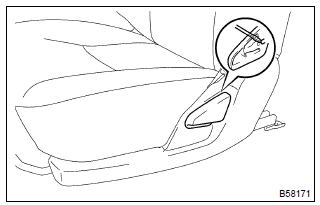
- Using a screwdriver, remove the reclining adjuster release handle.
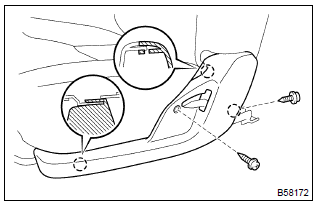
- Remove the seat cushion shield outer.
- w/ side airbag: disconnect the airbag wire under the seat.
- remove the hog rings, 4 bolts and seat back.
4. Remove separate type front seat back cover
- remove the hog rings and turn up the seat back cover.
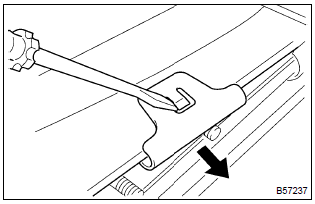
- W/ side airbag: using a screwdriver, disconnect the clip.
- remove the headrest supports, seat back cover and seat back pad.
5. Remove separate type front seat cushion cover
- remove the hog rings, seat cushion cover and seat cushion pad.
6. Remove front seat adjuster
- remove the reclining adjuster inside covers.
7. Install front seat adjuster
- install the reclining adjuster inside covers.
8. Install separate type front seat cushion cover
- install the seat cushion pad to the seat adjuster.
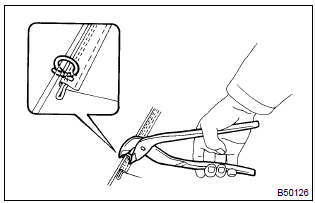
- Using hog ring pliers, install the seat cushion cover with new hog rings.
Notice
:
- be careful not to damage the cover.
- Be careful to prevent the cover wrinkles as little as possible.
9. Install separate type front seat back cover
- install the seat back pad to the seat back spring assy.
- cover the top of the seat back with the seat back cover.
- install the headrest supports.
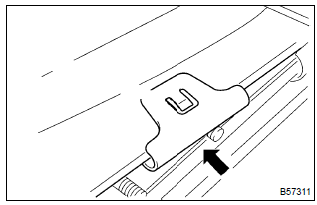
- W/ side airbag: connect the clip.
- using hog ring pliers, fully install the seat back cover with new hog rings.
Notice
:
- be careful not to damage the cover.
- Be careful to prevent the cover wrinkles as little as possible.
10. Install separate type front seat back assy
- install the seat back with the 4 bolts.
Torque: 43 nvm (440 kgfvcm, 32 ftvlbf)
- using hog ring pliers, install new hog rings.
- install the cushion shield outer with the 2 screws.
- Install the vertical seat adjuster knob with the clip.
- install the reclining adjuster release handle.
- install the cushion shield inner with the 2 screws.
- install the seat belt inner with the washer and bolt.
Torque: 42 nvm (430 kgfvcm, 31 ftvlbf)
- check that the seat belt inner moves smoothly.
11. Install front seat
- slide the seat to the most rear position.
- place the seat on the cabin.
Notice
: be careful not to damage the body.
- connect the connector(s) under the seat.
- install the front seat with the 4 bolts.
Torque: 47 nvm (480 kgfvcm, 35 ftvlbf)
- install the seat track covers.
- install the headrest.
Other materials:
Inspection procedure
1 Check p/t squib(lh) circuit(airbag sensor assy center – front seat
outer belt assy lh)
Disconnect the negative (–) terminal cable from the battery,
and wait at least for 90 seconds.
disconnect the connectors between the airbag sensor
assy center and the seat belt pretensio ...
Using the AUX port
This port can be used to connect a portable audio device and listen to it through
the vehicle’s speakers. Press until
“AUX” is displayed.
Connecting a portable player
■Operating portable audio devices connected to the audio system
The volume can be adjusted using the vehicle's ...
Purpose of the readiness tests
The on–board diagnostic (obd ii) system is designed to monitor the
performance of emission–related
components and report any detected abnormalities in the form of diagnostic
trouble codes
(dtcs). Since the various components need to be monitored during different
driving condition ...


