Toyota Corolla (E210) 2019-2026 Owners Manual / Driving / Operating the lights and wipers / Windshield wipers and washer
Toyota Corolla (E210): Windshield wipers and washer
Operating the lever can use the windshield wipers or the washer.
NOTICE
■When the windshield is dry
Do not use the wipers, as they may damage the windshield.
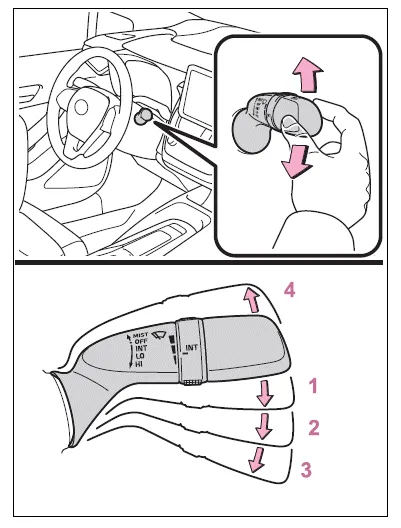
Operating the wiper lever
Operating the lever operates
the wipers or washer as follows.
lever operates
the wipers or washer as follows.
 (U.S.A.) or
 (Canada)
Intermittent windshield wiper
operation
(Canada)
Intermittent windshield wiper
operation (U.S.A.) or
 (Canada)
Low speed windshield wiper operation
(Canada)
Low speed windshield wiper operation (U.S.A.) or
 (Canada)
High speed windshield wiper
operation
(Canada)
High speed windshield wiper
operation (U.S.A.) or
 (Canada)
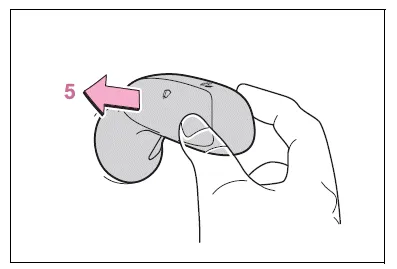
Temporary operation
(Canada)
Temporary operation
 Washer/wiper dual
operation
Washer/wiper dual
operation
Pulling the lever operates the wipers and washer.
Wipers will automatically operate a couple of times after the washer squirts.
Interval adjustment type only: Wiper intervals can be adjusted when intermittent operation is selected.
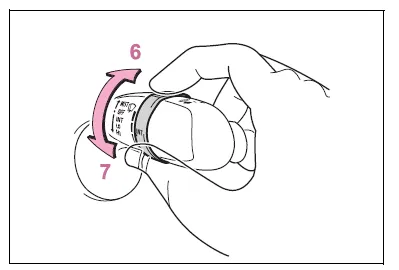
- Increases the intermittent windshield wiper frequency
- Decreases the intermittent windshield wiper frequency
■The windshield wiper and washer can be operated when
The engine switch is in ON.
■If no windshield washer fluid sprays
Check that the washer nozzles are not blocked if there is washer fluid in the windshield washer fluid reservoir.
■When stopping the engine in an emergency while driving
If the windshield wipers are operating when the engine is stopped, the windshield wipers will operate in high speed operation. After the vehicle is stopped, operation will return to normal when the engine switch is turned to ON.
WARNING
■Caution regarding the use of washer fluid
When it is cold, do not use the washer fluid until the windshield becomes warm. The fluid may freeze on the windshield and cause low visibility. This may lead to an accident, resulting in death or serious injury.
NOTICE
■When the washer fluid tank is empty
Do not operate the switch continually as the washer fluid pump may overheat.
■When a nozzle becomes blocked
In this case, contact your Toyota dealer. Do not try to clear it with a pin or other object. The nozzle will be damaged.


Other materials:
On–vehicle inspection
1. Inspect w/receiver condenser assy
if a fin of the w/receiver condenser assy is dirty, clean it with
water and dry it with compressor air.
Notice:
do not damage the fin of the w/receiver condenser assy.
if a fin of the w/receiver condenser assy is bent, make it
straig ...
For vehicles equipped with catalytic converter
Caution:
if large amount of unburned fuel flows into the converter, it may cause
overheating and a fire hazard.
To prevent this, observe the following precautions.
Use only unleaded gasoline.
avoid prolonged idling.
Avoid running the engine at idle speed for more than 20 minutes. ...
How to proceed with troubleshooting
1 Vehicle brought to workshop
2 Customer problem analysis
3 Problem symptom confirmation
4 Circuit inspection
5 Repair or replace
6 Confirmation test
7 End
Customer problem analysis check
...