Toyota Corolla (E120) 2002–2008 Repair Manual / Rear suspension / Rear axle beam assy
Toyota Corolla (E120): Rear axle beam assy
Replacement
Hint
: components: 1. Remove rear wheel
- remove the rh and lh rear wheels.
2. Remove rear brake drum sub–assy
3. Separate skid control sensor wire
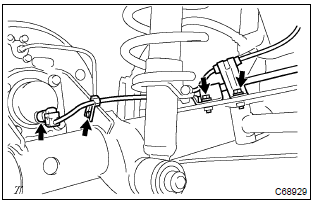
- Disconnect the skid control sensor connector.
- remove the 2 bolts and separate the wire harness clamps.
- remove the bolt and separate parking brake cable clamp.
- using the same manner desoribed above to the other side.
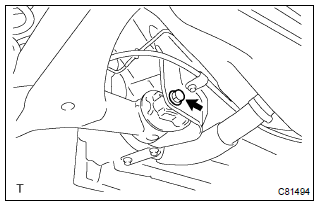
4. Remove stabilizer bar rear
5. Remove rear axle hub & bearing assy lh
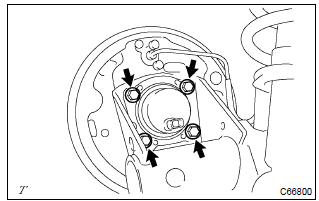
- Remove the 4 bolts and rear axle hub from the axle beam.
6. Remove rear axle hub & bearing assy rh
Hint
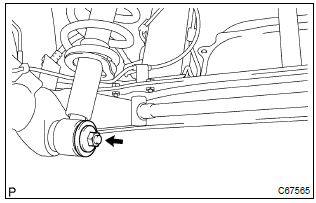
: remove the rh side by the same procedures with the lh side. 7. Separate rear shock absorber with coil spring
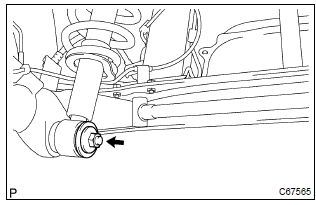
- Remove the nut, washer and separate the rear shock absorber w/coil spring (lower side) from the rear axle beam.
- using the same manner desoribed above to the other side.
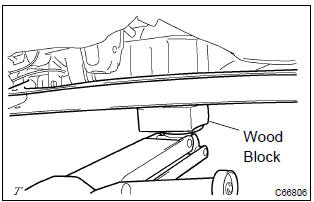
8. Remove rear axle beam assy

- Support the rear axle beam with jack.
- Remove the 2 bolts, nuts and rear axle beam.
9. Remove rear axle carrier bush lh
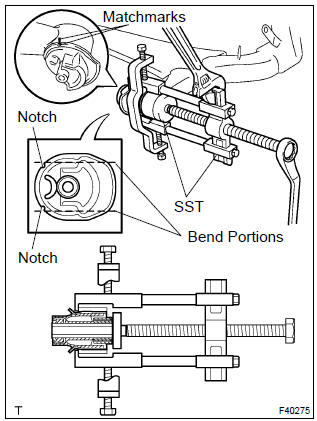
- Place matchmarks on the 2 notches of the bushing and axle beam.
- using a chisel and a hammer, bend the 2 portions of the bushing rib.
Hint
: bend the bushing rib until the claw of sst can be hung.
- using sst, remove the bushing from the axle beam.
Sst 09950–40011 (09951–04020, 09952–04010, 09953–04030, 09954–04020, 09955–04051, 09957–04010, 09958–04011), 09950–60010 (09951–00630)
Notice
: if the axle beam has been scratched, apply the paint. 10. Remove rear axle carrier bush rh
Hint
: remove the rh side by the same procedures with the lh side. Sst 09950–40011 (09951–04020, 09952–04010, 09953–04030, 09954–04020, 09955–04051, 09957–04010, 09958–04011), 09950–60010 (09951–00630)
11. Install rear axle carrier bush lh
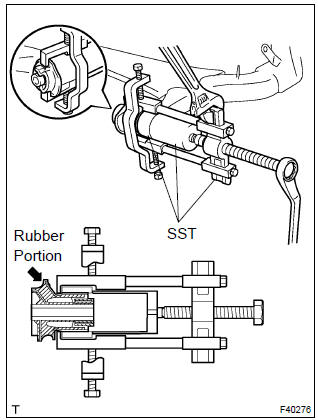
- Align the matchmarks on the axle beam with the 2 notches of a new bushing and temporarily install the bushing to the axle beam.
- using sst, install the bushing to the axle beam.
Sst 09950–40011 (09951–04020, 09952–04010, 09953–04030, 09954–04020, 09955–04051, 09957–04010, 09958–04011), 09950–60010 (09951–00620), 09710–04101
Notice
:
- hang the claw of sst to the bushing deeply and firmly.
- Do not scratch the rubber portion of the bushing.
- Do not deform the bushing rib.
12. Install rear axle carrier bush rh
Hint
: install the rh side by the same procedures with the lh side.
Sst 09950–40011 (09951–04020, 09952–04010, 09953–04030, 09954–04020, 09955–04051, 09957–04010, 09958–04011), 09950–60010 (09951–00620), 09710–04101
13. Temporary tighten rear axle beam assy
- Support the rear axle beam with jack.
- install the rear axle beam, 2 bolts, and temporary tighten the 2 nuts.
14. Temporary tighten rear shock absorber with coil spring
- Install the rear shock absorber, washer and temporary tighten the nut.
- using the same manner described above to the other side.
15. Install rear axle hub & bearing assy lh
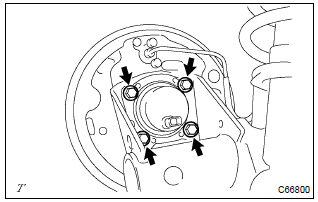
- Install the rear axle hub with the 4 bolts.
Torque: 61 nvm (622 Kgf·cm, 45 ft·lbf)
16. Install rear axle hub & bearing assy rh
Hint
: install the rh side by the same procedures with the lh side.
17. Install stabilizer bar rear
18. Install skid control sensor wire
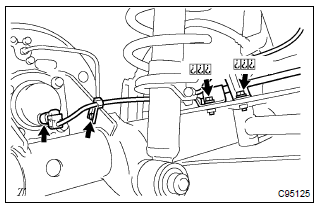
- Install the wire harness and parking brake cable with the
2 bolts and clip.
Torque:
(a): 5.4 Nvm (55 Kgf·cm, 48 in.Vlbf) (b): 5.0 Nvm (51 Kgf·cm, 44 in.Vlbf) - connect the skid control sensor connector.
- using the same manner desoribed above to the other side.
19. Install rear brake drum sub–assy
20. Stabilize suspension
- install the rear wheel and jack down the vehicle.
Torque: 103 nvm (1,050 Kgf·cm, 76 ft·lbf)
- bounce the vehicle up and down several times to stabilize the suspension.
21. Fully tighten rear axle beam assy
- Fully tighten the bolt.
Torque: 85 nvm (867 Kgf·cm, 62 ft·lbf)
- using the same manner described above to the other side.
22. Fully tighten rear shock absorber with coil spring
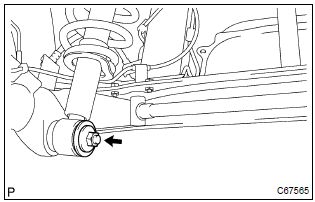
- Fully tighten the nut.
Torque: 80 nvm (816 Kgf·cm, 59 ft·lbf)
- using the same manner described above to the other side.
23. Inspect rear wheel alignment
24. Check abs speed sensor signal


Other materials:
Tire & wheel
Wheel and tire system
Inspection
1. Inspect tire
check the tires for wear and proper inflation pressure.
Cold tire inflation pressure:
Using a dial indicator, check the tire runout.
Tire runout: 3.0 Mm (0.118 In.) Or less
2. Rotate tire
Hint:
see the illustration ...
Overhaul
Hint: component:
1. Discharge refrigerant from refrigeration system
sst 07110–58060 (07117–58080, 07117–58090, 07117–78050, 07117–88060,
07117–88070,
07117–88080)
2. Disconnect cooler refrigerant suction hose no.1
Install sst to piping clamp.
Sst 09870–00015
Hint ...
Overhaul
Hint: components:
1. Remove rear wheel
2. Remove spare wheel cover assy
3. Remove rear floor finish plate
4. Remove luggage compartment trim cover inner lh
5. Remove rear shock absorber with coil spring
Support the rear axle beam with jack.
Remove the 2 nuts and bolt.
...