Toyota Corolla (E120) 2002–2008 Repair Manual / Power steering / Power steering system / On–vehicle inspection
Toyota Corolla (E120): On–vehicle inspection
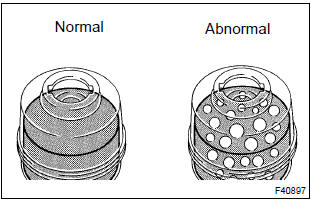
1. Inspect drive belt
- Visually check the belt for excessive wear, frayed cords, etc.
If any defect is found, replace the drive belt.
Hint
: cracks on the rib side of a belt are considered acceptable. If the missing chunks from the ribs are found on the belt, it should be replaced.
2. Bleed power steering system
- check the fluid level.
- jack up the front of the vehicle and support it with the stands.
- turn the steering wheel.
- With the engine stopped, turn the wheel slowly from lock to lock several times.
- lower the vehicle.
- start the engine.
- Run the engine at idle for a few minutes.
- turn the steering wheel.
- With the engine idling, turn the wheel to left or right full lock position and keep it there for 2 – 3 seconds, then turn the wheel to the opposite full lock position and keep it there for 2 – 3 seconds.
- Repeat (1) several times.
- stop the engine.
- check for foaming or emulsification.
Especially, if the system has to be bled twice because of foaming or emulsification, check for fluid leaks in the system.
- check the fluid level.
3. Check fluid level
- Keep the vehicle level.
- with the engine stopped, check the fluid level in the oil reservoir.
If necessary, add fluid.
Fluid: atf dexron® ii or iii
Hint
: check that the fluid level is within the hot level range on the reservoir tank. If the fluid is cold, check that it is within the cold level range.
- Start the engine and run it at idle.
- turn the steering wheel from lock to lock several times to
raise fluid temperature.
Fluid temperature: 75 – 80°c (167 – 176°f)
- check for foaming or emulsification.
If foaming or emulsification is identified, bleed the power steering system.
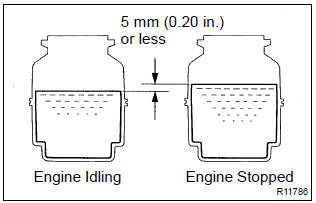
- With the engine idling, measure the fluid level in the oil reservoir.
- stop the engine.
- wait a few minutes and measure the fluid level in the oil
reservoir again.
Maximum fluid level rise: 5 mm (0.20 In.) If a problem is found, bleed the power steering system.
- check the fluid level.
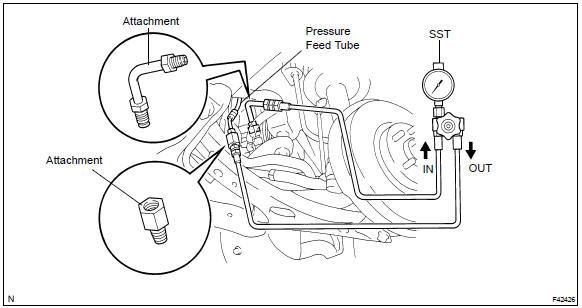
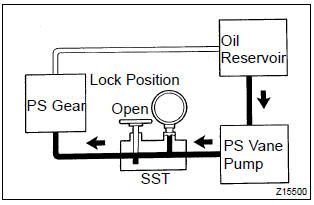
4. Check steering fluid pressure
- disconnect the pressure feed tube from the ps gear .
- connect sst, as shown in the illustration.
Sst 09640–10010 (09641–01010, 09641–01020, 09641–01030) N
otice
: check that the valve of the sst is in the open position.
- bleed the power steering system.
- start the engine and run it at idle.
- turn the steering wheel from lock to lock several times to
raise fluid temperature.
Fluid temperature: 75 – 80 °c (167 – 176 °f)
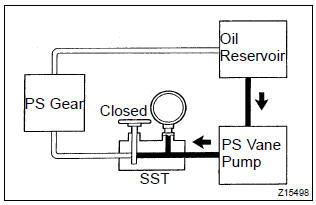
- With the engine idling, close the valve of the sst and observe
the reading on the sst.
Fluid pressure: 7,300 – 7,800 kpa (75 – 80 kgf/cm2, 1,067 – 1,138 psi)
Notice
:
- do not keep the valve closed for more than 10 seconds.
- Do not let the fluid temperature become too high.
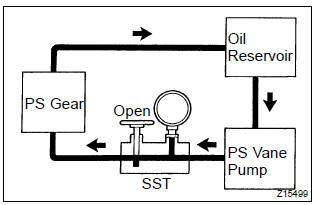
- With the engine idling, open the valve fully.
- measure the fluid pressure at engine speeds of 1,000 rpm
and 3,000 rpm.
Fluid pressure difference: 490 kpa (5 kgf/cm2, 71 psi) or less
Notice
: do not turn the steering wheel.
- With the engine idling and valve fully opened, turn
the
steering wheel to full lock position.
Fluid pressure: 7,300 – 7,800 kpa (75 – 80 kgf/cm2, 1,067 – 1,138 psi)
Notice
:
- do not maintain lock position for more than 10 seconds.
- Do not let the fluid temperature become too high.
- Disconnect the sst.
Sst 09640–10010 (09641–01010, 09641–01020, 09641–01030)
- connect the pressure feed tube to the ps gear .
- bleed the power steering system.
5. Check steering effort
- Center the steering wheel assy.
- remove the horn button assy .
- start the engine and run it at idle.
- measure the steering effort in both directions.
Steering effort (reference): 6 n·m (60 kgf·cm, 53 in.·Lbf) or less
Hint
: take the tire type, pressure and contact surface into consideration before making your diagnosis.
- install the steering wheel assy set nut.
Torque: 50 n·m (510 kgf·cm, 37 ft·lbf)
- install the horn button assy


Other materials:
Using a flat bed truck
If you use chains or cables to tie down your vehicle, the angles shaded in black
must be 45°.
Do not overly tighten the tie downs or the vehicle may be damaged.
■Before emergency towing
1 Vehicles without a smart key system: Put the engine switch in the “ACC” (engine
off) or “O ...
Introductions
4. Anti-rust treatment after installation
(A) body sealer application
Purpose:
for water-proofing and anti-rust measures, always
apply the body sealer to the body panel seams and
hems of the doors, hood, etc.
Notice:
apply body sealer neatly to parts that require a
high quality appeara ...
If the vehicle becomes stuck
Carry out the following procedures
if the tires spin or
the vehicle becomes stuck
in mud, dirt or snow:
Recovering procedure
1. Stop the engine. Set the
parking brake and shift the
shift lever to P.
Do not press the shift release button
after shifting the shift lever to P.
2. Remove the mud, snow ...