Toyota Corolla (E210) 2019-2026 Owners Manual / For safety and security / Child safety / Using an anchor bracket
(for top tether strap)
(except for Puerto Rico)
Toyota Corolla (E210): Using an anchor bracket (for top tether strap) (except for Puerto Rico)
■ Anchor brackets (for top tether strap)
Anchor brackets are provided for each rear seat.
Use anchor brackets when fixing the top tether strap.
- Anchor brackets
- Top tether strap
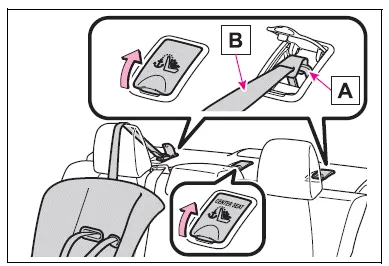
■ Fixing the top tether strap to the anchor bracket
Install the child restraint system in accordance to the operation manual enclosed with the child restraint system.
Rear outboard seats
Open the anchor bracket cover, latch the hook onto the anchor bracket and tighten the top tether strap.
Make sure the top tether strap is securely latched.
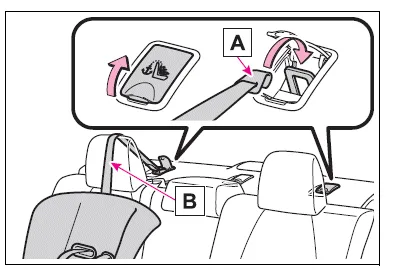
- Hook
- Top tether strap
Rear center seat
Latch the hook onto the anchor bracket and tighten the top tether strap.
Make sure the top tether strap is securely latched.

- Hook
- Top tether strap
■Laws and regulations pertaining to anchors
The LATCH system conforms to FMVSS225 or CMVSS210.2.
Child restraint systems conforming to FMVSS213 or CMVSS213 specifications can be used.
This vehicle is designed to conform to SAE J1819.
WARNING
■When installing a child restraint system
Observe the following precautions.
Failure to do so may result in death or serious injury.
- Firmly attach the top tether strap and make sure that the belt is not twisted.
- Do not attach the top tether strap to anything other than the anchor bracket.
- After securing a child restraint system, never adjust the seat.
- Follow all installation instructions provided by the child restraint system manufacturer.
NOTICE
■Anchor brackets (for top tether strap)
When not in use, make certain to close the lid. If it remains open, the lid may be damaged.


Other materials:
Washer fluid
Add washer fluid in the following situations:
● A washer does not work.
● Vehicles without a multi-information display: The low windshield washer fluid
warning light (if equipped) comes on.
● Vehicles with a multi-information display: The warning message (if equipped) appear ...
Sound quality is bad in all modes (volume is too low)
Wiring diagram
Inspection procedure
1 Adjust sound quality
Adjust the sound quality.
Operate the radio receiver assy to adjust the sound quality.
Standard: malfunction disappear.
2 Compare it with another car of same model
Compare it with another vehicle of the same mo ...
Deleting call histories
Select “Delete Call History” using
. ● Deleting outgoing call history
1 Select “Outgoing Calls” using .
2 Select the desired phone number using
and press
(YES).
To delete all outgoing call history data, press
(ALL) and then press
(YES).
● Deleting incoming call histo ...