Toyota Corolla (E210) 2019-2025 Owners Manual / For safety and security / Child safety / Child restraint system
fixed with an ISOFIX lower
anchorage (for Puerto
Rico)
Toyota Corolla (E210): Child restraint system fixed with an ISOFIX lower anchorage (for Puerto Rico)
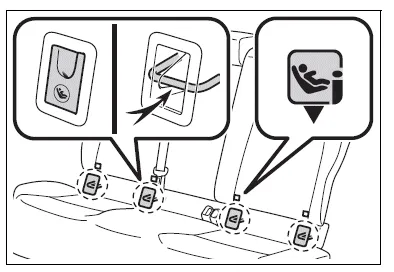
■ ISOFIX lower anchorages (ISOFIX child restraint system)
Lower anchorages are provided for the outboard rear seats.
(Marks displaying the location of the anchorages are attached to the seats.)
■ When installing in the rear outboard seats
Install the child restraint system in accordance to the operation manual enclosed with the child restraint system.
With flexible lower attachments
1. Remove the anchorage covers, and install the child restraint system to the seat.
The bars are installed behind the anchorage covers.
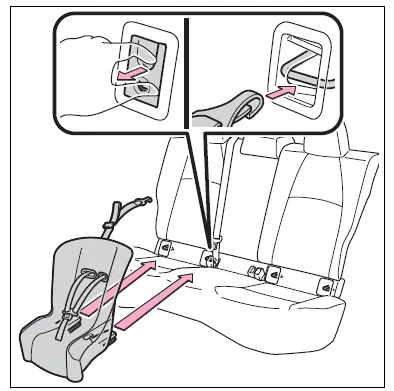
With rigid lower attachments
1. Remove the anchorage covers, and install the child restraint system to the seat.
The bars are installed behind the anchorage covers.
2. If the child restraint has a top strap, follow the child restraint manufacturer's operation manual regarding the installation, using the top strap to latch onto the top strap anchorage.
3. After installing the child restraint system, rock it back and forth to ensure that it is installed securely.
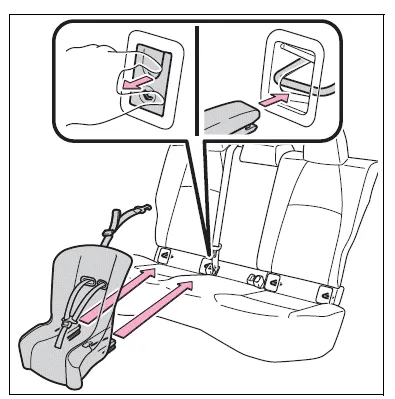
■ When installing in the rear center seat
There are no lower anchorages behind the rear center seat.
However, the inboard lower anchorages of the outboard seats, which are 15.6 in. (396 mm) apart, can be used if the child restraint system manufacturer's instructions permit use of those anchorages with the anchorage spacing stated.
Child restraint systems with rigid lower attachments cannot be installed in the center seat. This type of child restraint system can only be installed in the outboard seat.
WARNING
■When installing a child restraint system
Observe the following precautions.
Failure to do so may result in death or serious injury.
- When using the lower anchorages, be sure that there are no foreign objects around the anchorages and that the seat belt is not caught behind the child restraint system.
- Follow all installation instructions provided by the child restraint system manufacturer.
- Never attach two child restraint system attachments to the same anchorage. In a collision, one anchorage may not be strong enough to hold two child restraint system attachments and may break. If the lower anchorages are already in use, use the seat belt to install a child restraint system in the center seat.
- When securing some types of
child restraint systems in rear
seats, it may not be possible to
properly use the seat belts in
positions next to the child
restraint without interfering with
it or affecting seat belt effectiveness.
Be sure your seat belt fits snugly across your shoulder and low on your hips. If it does not, or if it interferes with the child restraint, move to a different position. Failure to do so may result in death or serious injury.
- If the seat is adjusted, reconfirm the security of the child restraint system.


Other materials:
Inspection procedure
1 Check d squib circuit(airbag sensor assy center – horn button
assy)
Disconnect the negative (–) terminal cable from the battery,
and wait at least for 90 seconds.
disconnect the connectors between the airbag sensor
assy center and the horn button assy.
for the oran ...
Replacement
1. Remove engine under cover rh
2. Remove fan and generator v belt
3. Remove generator assy
Disconnect the wire clamp from the wire clip on the rectifire
end frame.
remove the rubber cap and nut, and disconnect the alternator
wire.
disconnect the alternator connecto ...
Engine mechanical
Service data
Torque specification
...