Toyota Corolla (E120) 2002–2008 Repair Manual / Diagnostics / Supplemental restraint system / Short in side squib (rh) circuit / Inspection procedure
Toyota Corolla (E120): Inspection procedure
1 Check side squib(rh) circuit(airbag sensor assy center – front seat airbag assy rh)
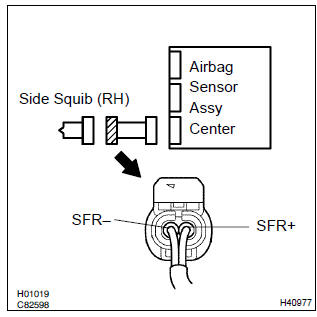
- Disconnect the negative (–) terminal cable from the battery, and wait at least for 90 seconds.
- disconnect the connectors between the front seat airbag assy (rh) and the airbag sensor assy center.
- release the airbag activation prevention mechanism of the connector (on the airbag sensor assy center side) between the airbag sensor assy center and the front seat airbag assy (rh) .
- for the connector (on the front seat airbag assy side) between
the airbag sensor assy center and the front seat
airbag assy (rh), measure the resistance between sfr+
and sfr–.
Ok: resistance: 1 mw or higher


2 Check air bag sensor assy center
Sst 09843–18040
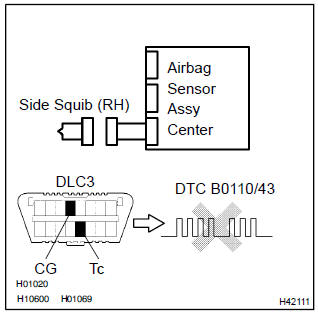
- Connect the the connector to the airbag sensor assy center.
- connect the negative (–) terminal cable to the battery, and wait at least for 2 seconds.
- turn the ignition switch to on, and wait at least for 20 seconds.
- clear the dtc stored in memory .
- turn the ignition switch to lock, and wait at least for 20 seconds.
- turn the ignition switch to on, and wait at least for 20 seconds.
- check the dtc .
Ok: dtc b0110/43 is not output.
Hint
: codes other than code b0110/43 may be output at this time, but they are not relevant to this check.


3 Check side squib(rh)
Sst 09843–18040
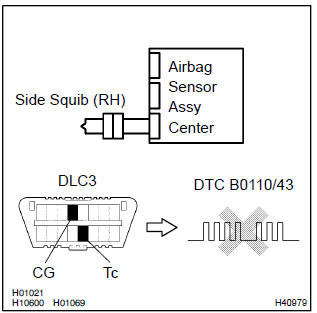
- Turn the ignition switch to lock.
- disconnect the negative (–) terminal cable from the battery, and wait at least for 90 seconds.
- connect the front seat airbag assy (rh) connector.
- connect the negative (–) terminal cable to the battery, and wait at least for 2 seconds.
- turn the ignition switch to on, and wait at least for 20 seconds.
- clear the dtc stored in memory .
- turn the ignition switch to lock, and wait at least for 20 seconds.
- turn the ignition switch to on, and wait at least for 20 seconds.
- check the dtc .
Ok: dtc b0110/43 is not output.
Hint
: codes other than code b0110/43 may be output at this time, but they are not relevant to this check.


Use simulation method to check


Other materials:
Switching the display
Press to display or hide the album
title.
If there is additional text, is
displayed.
Press and hold to display the remaining
text.
■USB memory functions
●Depending on the USB memory that is connected to the system, the device itself
may not be operable and certain function ...
On–vehicle inspection
1. Check basic function (manual operation function)
turn the ignition switch on.
Check that the door glass moves up when each window switch of the
regulator master switch
assembly is turned up and moves down when each window switch is turned down.
Check that the do ...
Terminals of ecu
1. Inspect integration relay
Disconnect the connector from the integration relay.
check the continuity between each terminal of the disconnected connector
and the body ground, as
shown in the illustration and table.
Standard:
If the result is not as specified, the vehicle’s ...