Toyota Corolla (E170): Front seats
Adjustment procedure
► Manual seat
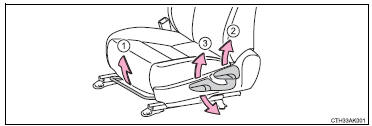
1 Seat position adjustment lever 2 Seatback angle adjustment lever 3 Vertical height adjustment lever (driver’s side only)
► Power seat (driver’s side only)
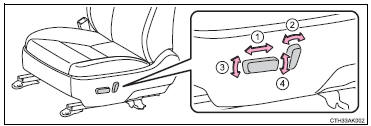
1 Seat position adjustment switch 2 Seatback angle adjustment switch 3 Seat cushion (front) angle adjustment switch 4 Vertical height adjustment switch
CAUTION
■Seat adjustment
●Be careful that the seat does not hit passengers or luggage.
●Do not recline the seat more than necessary when the vehicle is in motion to reduce the risk of sliding under the lap belt.
If the seat is too reclined, the lap belt may slide past the hips and apply restraint forces directly to the abdomen or your neck may contact the shoulder belt, increasing the risk of death or serious injury in the event of an accident.
●Manual seat only: After adjusting the seat, make sure that the seat is locked in position.
■When adjusting the seat positions
Make sure to leave enough space around the feet so they do not get stuck.


Other materials:
Inspection procedure
1 Inspect transmission wire(s1)
Disconnect the transmission wire connector from the
transaxle.
measure the resistance according to the value(s) in the
table below.
Standard:
2 Check harness and connector(transmission wire – ecm)
Connect the transmission connec ...
Circuit description
A thermistor is built in the engine coolant temperature sensor and changes
the resistance value according
to the engine coolant temperature.
The structure of the sensor and connection to the ecm is the same as those of
the intake air temperature
sensor.
Hint:
if the ecm detects the dtc ...
Inspection procedure
1 Inspect park/neutral position switch assy
Disconnect the park/neutral position switch connector.
measure resistance according to the value(s) in the table
below when the shift lever is moved to each position.
Standard:
2 Check harness and connector(park/neutral position ...