Toyota Corolla (E120) 2002–2008 Repair Manual / Diagnostics / Electronic controlled automatic transaxle / Data list/active test
Toyota Corolla (E120): Data list/active test
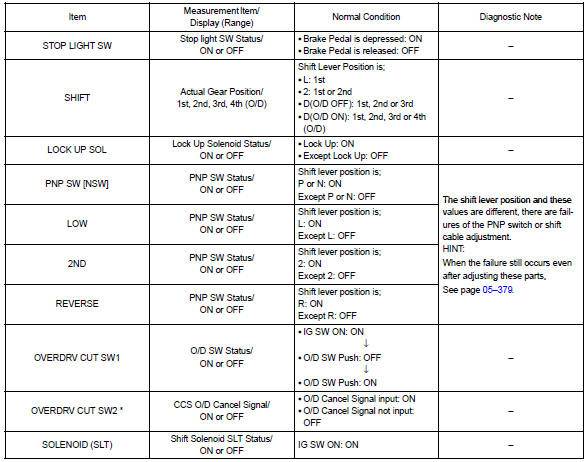
1. Data list
Hint
: according to the data list displayed by the obd ii scan tool or hand–held tester, you can read the value of the switch, sensor, actuator and so on without parts removal. Reading the data list as the first step of troubleshooting is one method to shorten labor time.
- Warm up the engine.
- turn the ignition switch off.
- connect the obd ii scan tool or hand–held tester to the dlc3.
- turn the ignition switch to the on position.
- according to the display on tester, read the ”data list”.

2. Active test
Hint
: performing the active test using the hand–held tester allows the relay, vsv, actuator and so on to operate without parts removal. Performing the active test as the first step of troubleshooting is one method to shorten labor time.
It is possible to display the data list during the active test.
- warm up the engine.
- turn the ignition switch off.
- connect the hand–held tester to the dlc3.
- turn the ignition switch to the on position.
- according to the display on tester, perform the ”active test”.
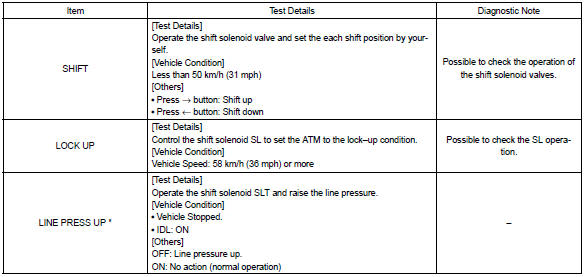
*: ”Line press up” in the active test is performed to check the line pressure changes by connecting the sst to the automatic transaxle, which is used in the hydraulic test as well.
Hint
: the pressure values in active test and hydraulic test are different from each other.


Other materials:
Overhaul
1. Remove cylinder block water drain cock sub–assy
Remove the cylinder block water drain cock from the cylinder
block.
2. Inspect connecting rod thrust clearance
Using a dial indicator, measure the thrust clearance while
moving the connecting rod back and forth.
Standard t ...
Favorites list setting
Up to 15 contacts (maximum of 4 numbers per contact) can be registered in the
favorites list.
■ Registering the contacts in the favorites list
1 Select “Add Favorite”.
2 Select the desired contact to add to the favorites list.
Dimmed contacts are already stored as a favorite.
3 Chec ...
How to proceed with troubleshooting
The hand–held tester can be used at step 3, 4, 6, 9.
1 Vehicle brought to workshop
2 Customer problem analysis
3 Connect the obd ii scan tool or hand–held tester to dlc3
4 Check and clear dtc and freeze frame data
5 Visual inspection
6 Setting the check mode diagnosis
7 Proble ...