Toyota Corolla (E210) 2019-2026 Owners Manual / For safety and security / Child safety / Child restraint systems
Toyota Corolla (E210): Child restraint systems
Before installing a child restraint system in the vehicle, there are precautions that need to be observed, different types of child restraint systems, as well as installation methods, etc., written in this manual.
Use a child restraint system when riding with a small child that cannot properly use a seat belt. For the child's safety, install the child restraint system to a rear seat.
Be sure to follow the installation method that is in the operation manual enclosed with the restraint system.
Table of contents
Child restraint system installation method
- Fixed with a seat belt
- Fixed with a child restraint LATCH anchor (except for Puerto Rico)
- Fixed with an ISOFIX lower anchorage (for Puerto Rico)
- Using an anchor bracket (for top tether strap) (except for Puerto Rico)
- Using a top tether anchorage (for Puerto Rico)
Points to remember
The laws of all 50 states of the U.S.A. as well as Canada now require the use of child restraint systems.
- Prioritize and observe the warnings, as well as the laws and regulations for child restraint systems.
- Use a child restraint system until the child becomes large enough to properly wear the vehicle's seat belt.
- Choose a child restraint system that suits your vehicle and is appropriate to the age and size of the child.
WARNING
‚ñÝWhen a child is riding
Observe the following precautions.
Failure to do so may result in death or serious injury.
- For effective protection in automobile accidents and sudden stops, a child must be properly restrained, using a seat belt or child restraint system which is correctly installed. For installation details, refer to the operation manual enclosed with the child restraint system. General installation instruction is provided in this manual.
- Toyota strongly urges the use of a proper child restraint system that conforms to the weight and size of the child, installed on the rear seat. According to accident statistics, the child is safer when properly restrained in the rear seat than in the front seat.
- Holding a child in your or someone
else's arms is not a substitute
for a child restraint system.
In an accident, the child can be crushed against the windshield or between the holder and the interior of the vehicle.
‚ñÝHandling the child restraint system
If the child restraint system is not properly fixed in place, the child or other passengers may be seriously injured or even killed in the event of sudden braking, sudden swerving, or an accident.
- If the vehicle were to receive a strong impact from an accident, etc., it is possible that the child restraint system has damage that is not readily visible. In such cases, do not reuse the restraint system.
- Make sure you have complied with all installation instructions provided with the child restraint system manufacturer and that the system is properly secured.
- Keep the child restraint system properly secured on the seat even if it is not in use. Do not store the child restraint system unsecured in the passenger compartment.
- If it is necessary to detach the child restraint system, remove it from the vehicle or store it securely in the trunk.
Child restraint system
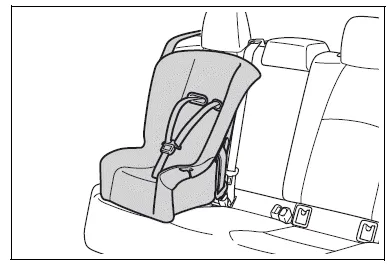
‚ñÝ Types of child restraint system installation methods
Confirm with the operation manual enclosed with the child restraint system about the installation of the child restraint system.
Seat belt attachment
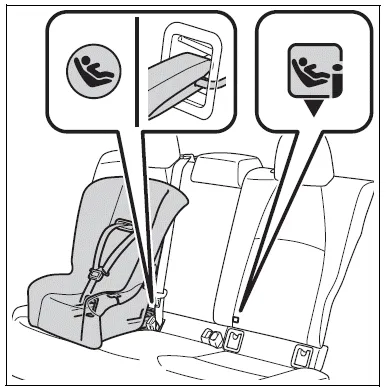
Except for Puerto Rico: Child restraint LATCH anchors attachment
Except for Puerto Rico:

For Puerto Rico: ISOFIX lower anchorage attachment
For Puerto Rico:
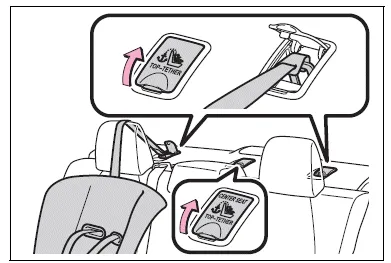
Except for Puerto Rico: Anchor brackets (for top tether strap) attachment
Except for Puerto Rico:
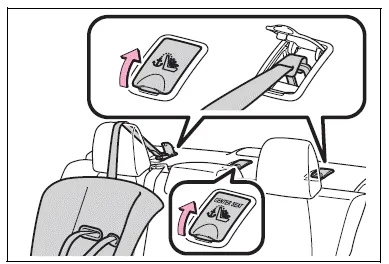
For Puerto Rico: Top tether anchorage attachment
For Puerto Rico:


Other materials:
Power steering
Preparation
Sst
Recomended tools
Equipment
Lubricant
Ssm
...
Diagnosis system
Description
when troubleshooting obd ii vehicles, the only difference
from the usual troubleshooting procedure
is that you need to connect an obd ii scan tool complying
with sae j1987 or a hand–held tester to the
vehicle, and read off various data output from the
vehicle‚Ä ...
Listing the registered portable players
Select “List Audio” using .
The list of registered portable players will be displayed.
● Connecting the registered portable player to the audio system
1 Select the name of the portable player to be connected using
.
2 Select “Select” using .
● Deleting the registered ...