Toyota Corolla (E210) 2019-2026 Owners Manual / For safety and security / Child safety / When using a child
restraint system
Toyota Corolla (E210): When using a child restraint system
■ When installing a child restraint system to a front passenger seat
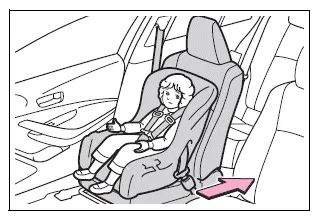
For the safety of a child, install a child restraint system to a rear seat. When installing a child restraint system to a front passenger seat is unavoidable, adjust the seat as follows and install the child restraint system:
- Move the front seat fully rearward.
- If the passenger seat height can be adjusted, Adjust the seat height to the upper most position.
- Adjust the seatback angle to the most upright position.
If there is a gap between the child seat and the seatback, adjust the seatback angle until good contact is achieved.
- If the head restraint interferes with the child restraint system installation and the head restraint can be removed, remove the head restraint.
Otherwise, put the head restraint in the upper most position.

WARNING
■When using a child restraint system
Observe the following precautions.
Failure to do so may result in death or serious injury.
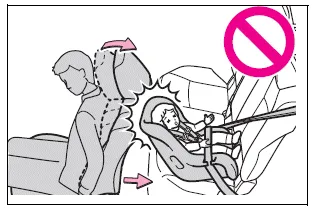
- Never install a rear-facing child
restraint system on the front
passenger seat even if the "AIR
BAG OFF" indicator light is illuminated.
In the event of an accident, the force of the rapid inflation of the front passenger airbag can cause death or serious injury to the child if the rear-facing child restraint system is installed on the front passenger seat.
- A forward-facing child restraint system may be installed on the front passenger seat only when it is unavoidable. A child restraint system that requires a top tether strap should not be used in the front passenger seat since there is no top tether strap anchor for the front passenger seat.
- A forward-facing child restraint system may be installed on the front passenger seat only when it is unavoidable. When installing a forward-facing child restraint system on the front passenger seat, adjust the seatback angle to the most upright position, move the seat to the rearmost position, and raise the seat to the upper most position, even if the "AIR BAG OFF" indicator light is illuminated. If the head restraint interferes with the child restraint system installation and the head restraint can be removed, remove the head restraint.
- Do not allow the child to lean
his/her head or any part of
his/her body against the door or
the area of the seat, front or rear
pillars, or roof side rails from
which the SRS side airbags or
SRS curtain shield airbags
deploy even if the child is
seated in the child restraint system.
It is dangerous if the SRS side and curtain shield airbags inflate, and the impact could cause death or serious injury to the child.

WARNING
- When a booster seat is installed, always ensure that the shoulder belt is positioned across the center of the child's shoulder. The belt should be kept away from the child's neck, but not so that it could fall off the child's shoulder.
- Use child restraint system suitable to the age and size of the child and install it to the rear seat.
- If the driver's seat interferes with the child restraint system and prevents it from being attached correctly, attach the child restraint system to the right-hand rear seat.
- Adjust the front passenger seat so that it does not interfere with the child restraint system.


Other materials:
Circuit description
The p/t squib (lh) circuit consists of the airbag sensor assy center and seat
belt pretensioner (lh).
It causes the srs to deploy when the srs deployment conditions are satisfied.
Dtc b0135/73 is recorded when a short is detected in the p/t squib (lh) circuit.
Wiring diagram
...
Initialization
Select “Initialize” using .
● Initializing the sound settings
Select “Sound setting” using and press
(YES).
For details about sound settings: ● Initializing the device information
Select “Car Device Info” using and
press (YES).
Automatic connection of a portable ...
Replacement
Hint: components:
1. Precaution
2. Disconnect battery negative terminal
3. Remove instrument panel sub–assy lower
Remove the screw from the glove compartment door
stopper sub–assy.
pull the instrument panel sub–assy lower to remove it.
4. Separate passenger airbag co ...