
Toyota Corolla (E120): Replacement
Hint
: components:
1. Precaution
2. Disconnect battery negative terminal
3. Remove parking brake hole cover sub–assy
4. Remove floor shift shift lever knob sub–assy (m/t transaxle)
5. Remove shifting hole cover sub–assy (m/t transaxle)
6. Remove console panel upper
7. Remove console box carpet
8. Remove rr console box
9. Remove air bag sensor assy center
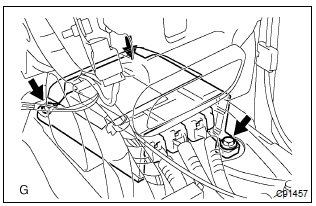
- Disconnect the 3 connectors from the airbag sensor assy center.
- remove the 3 bolts and airbag sensor assy center.
10. Inspect air bag sensor assy center
11. Install air bag sensor assy center
- check that the ignition switch is turned to off.
- check that the battery negative terminal is disconnected.
Notice
: do not start the operation for 90 seconds after removing the terminal.
- temporarily install the airbag sensor assy center with the 3 bolts.
- tighten the 3 bolts to the specified torque.
Torque: 17.5 Nvm (178 kgfvcm, 13 ftvlbf)
- connect the connector to the airbag sensor assy center.
- check that no play is identified.
12. Inspect srs warning light


Other materials:
Operating instructions
Turning the end of the lever turns on the lights as follows:
► Type A
1 The daytime running lights turn
on.
2 The side marker, parking, tail,
license plate, daytime running lights and instrument panel lights turn on.
3 The headlights and all the lights
listed above (except daytime ...
Circuit description
The shift solenoid valve sl is turned ”on” and ”off” by signals from the ecm
in order to control the hydraulic
pressure operation, the lock–up relay valve, which then the controls operation
of the lock–up clutch.
Fail safe function:
if the ecm detects a malfunction, it turns the ...
Overhaul
Hint:
installation is in the reveres order of the removal. But the
installation is indicated only when it has a
point.
In the rh side, work in the same procedure as in the lh side.
1. Remove rear armrest assy lh
Using a screwdriver, remove the rear armrest.
Hint:
tape the s ...