Toyota Corolla (E120): Replacement
Hint
:
- installation is in the reverse order of the removal. But the installation is indicated only when it has a point.
- In the lh side, work in the same procedure as in the rh side.
1. Disconnect battery negative terminal
2. Remove front seat assembly rh
3. Remove front seat inner belt assy rh
- remove the nut and front seat inner belt.
4. Remove front door scuff plate rh
5. Remove rear door scuff plate rh
6. Remove front door opening trim rh
7. Remove rear door opening trim rh
8. Remove center pillar garnish lower rh
9. Remove front seat outer belt assy rh
- Remove the floor anchor cover.
- remove the bolt and disconnect the front seat outer belt assembly rh (floor anchor side).
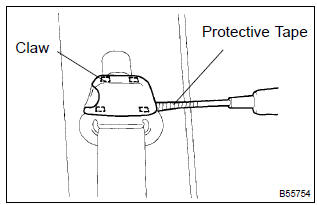
- using a screwdriver, remove the seat belt anchor cover.
Hint
: tape the screwdriver tip before use.
- remove the bolt and front seat outer belt (shoulder anchor side).
Notice
:
- removal operation of the seat belt with pretensioner must be started in 90 seconds or more after the ignition switch is turned off and the battery negative terminal is disconnected.
- Carefully read the notices for the ”pretensioner” in the srs airbag system and front seat outer belt assembly.
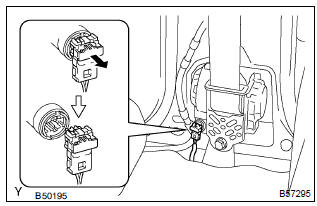
- disconnect the connector and remove the bolt.
10. Remove center pillar garnish rh
11. Remove front shoulder belt anchor adjuster assy
- remove the 2 bolts and front shoulder belt anchor adjuster assembly.
12. Install front shoulder belt anchor adjuster assy
- install the front shoulder belt anchor adjuster assembly with the
bolt.
Torque: 41.2 Nvm (420 kgfvcm, 30 ftvlbf)
13. Install front seat outer belt assy rh
Notice
: do not disassemble the retractor.
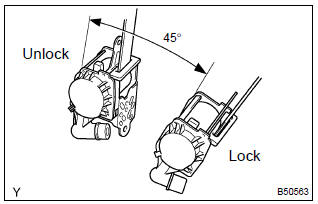
- check the degree of tilt when beginning to lock the elr.
- Check that the belt will not lock within 15 degrees of tilt in all the direction but the belt will lock over 45 degrees of tilt when moving the installed retractor gently.
If the operation is not as specified, replace the front seat outer belt assembly.
- install the retractor with the 2 bolts.
Torque:
4.9 Nvm (50 kgfvcm, 43 in.Vlbf) (upper part of retractor) 41.2 Nvm (420 kgfvcm, 30 ftvlbf) (lower part of retractor) - install the shoulder anchor with the bolt.
Torque: 41.2 Nvm (420 kgfvcm, 30 ftvlbf)
- install the seat belt anchor cover.
- install the floor anchor with the bolt.
Torque: 41.2 Nvm (420 kgfvcm, 30 ftvlbf)
- install the floor anchor cover.
- check the elr lock.
Notice
: check should be performed with the assembly installed.
- Check that the belt will lock when pulling out the belt quickly with the belt installed.
If the operation is not as specified, replace the front seat outer belt assembly.
14. Install front seat inner belt assy rh
- install the front seat inner belt assembly rh with the nut.
Torque: 41.2 Nvm (420 kgfvcm, 30 ftvlbf)


Other materials:
Supplemental restraint system
Preparation
Sst
Recomended tools
Equipment
...
Adjustment
Hint:
in the rh side, work in the same procedure as in the lh
side.
Since the centering bolt is used as a door side hinge bolt,
the door hinge cannot be adjusted with it on. Substitute
the bolt with washer for the centering bolt.
1. Inspect front door panel sub–assy lh
Che ...
Trip information
■ Switching the display
Items displayed can be switched by pressing the “DISP” switch.
■ Odometer
Displays the total distance the vehicle has been driven.
Except vehicles with a manual transmission: Press and hold the “DISP” switch
to change the display to the Eco Driving ...