Toyota Corolla (E120): Replacement
Hint
: components:
1. Precaution
2. Disconnect battery negative terminal
3. Remove seat track upper rail cover rh
4. Remove seat track upper rail cover lh
5. Remove front seat assy lh
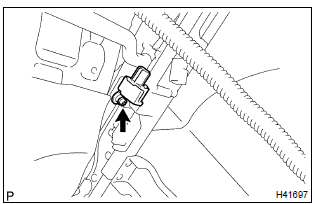
6. Remove seat position air bag sensor

- Disconnect the connector of the seat position airbag sensor.
- using a torx socket wrench (t30), remove the torx screw and seat position airbag sensor.
7. Install seat position air bag sensor
- using a torx socket wrench (t30), install the seat position airbag
sensor with the torx screw.
Torque: 8.0 Nvm (82 kgfvcm, 71 in.Vlbf)
- connect the connector of the seat position airbag sensor.
Notice
:
- installation of the connector is done with the seat position airbag sensor installed. Make sure the seat position airbag sensor is installed to the specified torque.
- If the seat position airbag sensor has been dropped, or there are cracks, dents or other defects in the case, bracket or connector, replace the seat position airbag sensor with a new one.
- When installing the seat position airbag sensor, take care that the srs wiring does not interfere with other parts and is not pinched between other parts.
- After installation, shake the seat position airbag sensor to check that there is no looseness.
8. Install front seat assy lh
torque: 47.1 Nvm (480 kgfvcm, 35 ftvlbf)
9. Inspect srs warning light
Other materials:
Overhaul
1. Remove control shift lever bush
Remove the control shift lever bush from the selecting
bellcrank assy.
2. Remove selecting bellcrank dust cover no.1
Remove the selecting bellcrank dust cover no.1 From the
selecting bellcrank assy.
3. Remove selecting bell crank no.2
...
Inspection procedure
1 Check relay (marking: starter cut)
Inspect the relay continuity, as shown in the illustration
and table.
Standard:
2 Check tvip ecu
Disconnect the tvip ecu connector.
turn the ignition switch position to the start.
measure the voltage between the termina ...
Power point socket assy
Replacement
Hint: components:
1. Remove floor shift shift lever knob sub–assy (m/t transaxle)
2. Remove console panel upper
3. Remove power point socket assy
Turn the socket in the circumference direction as shown
the illustration, disengage the claw between the socket
and the pow ...


