Toyota Corolla (E120) 2002–2008 Repair Manual / Diagnostics / Toyota vehicle intrusion protection system / Glass breakage sensor circuit / Inspection procedure
Toyota Corolla (E120): Inspection procedure
1 Check security indicator light
- Set the system in 30 seconds after filliping the security indicator to check if the alarm is triggered.


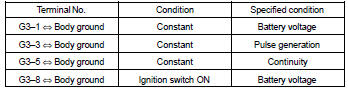
2 Check glass breakage sensor ecu (glass breakage sensor)

- Check the continuity and voltage of the glass breakage sensor ecu, as shown in the illustration and table.
Standard:


3 Check wire harness (tvip ecu glass breakage sensor ecu)
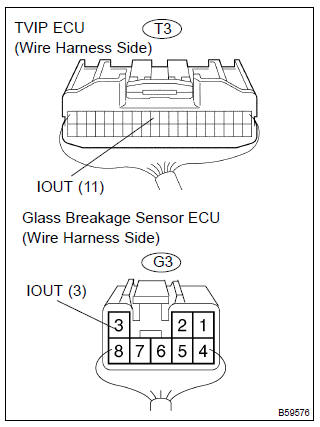
- Disconnect the tvip ecu and glass breakage sensor ecu connectors.
- check the continuity and between the connectors on the harness side, as shown in the illustration and table.
Standard:


4 Check wire harness (glass breakage sensor ecu body ground)
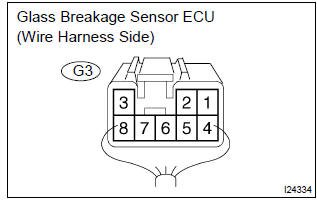
- Disconnect the glass breakage sensor ecu connector.
- check the continuity between the terminal of the glass breakage sensor ecu connector and the body ground, as shown in the illustration and table.
Standard:


Check and replace tvip ecu


Other materials:
Air outlets
■ Location of air outlets
The air outlets and air volume changes according to the selected airflow mode.
: Some models
■ Adjusting the position of and opening and closing the air outlets
► Front center outlets
Direct air flow to the left or right, up or down.
► Fron ...
Connecting a Bluetooth® device
Up to 5 Bluetooth® devices (Phones (HFP) and audio players (AVP)) can be registered.
If more than 1 Bluetooth® device has been registered, select which device to
connect to.
1 Press the “SETUP” button.
2 Select “Bluetooth*”.
*: Bluetooth is a registered trademark of Bluetooth SIG, In ...
Overhaul
1. Remove oil filler cap sub–assy
Remove the oil filler cap from the cylinder head cover.
2. Remove oil filler cap gasket
Using a screwdriver, remove the gasket from the oil filler
cap.
3. Remove ventilation valve sub–assy
Remove the ventilation valve from the cyl ...