Toyota Corolla (E120) 2002–2008 Repair Manual / Introduction / How to troubleshoot ecu controlled
systems / Problem symptoms table
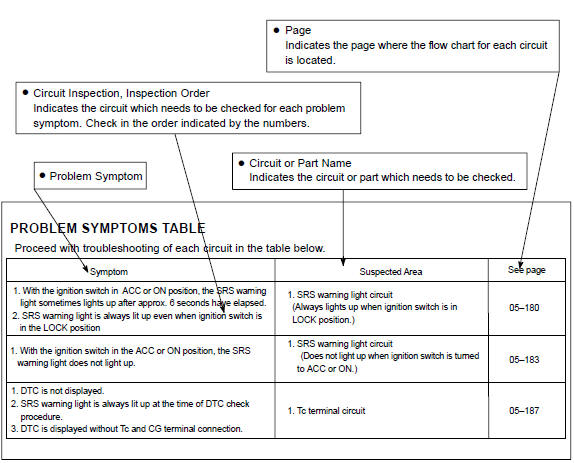
Toyota Corolla (E120): Problem symptoms table
The suspected circuits or parts for each problem symptom are shown in the table below. Use this table to troubleshoot the problem when a normal code is displayed in the diagnostic trouble code chart but the problem is still occurring. Numbers in the table indicate the order in which the circuits or parts should be checked.
Hint: when the problem is not detected by the diagnostic system even though the problem symptom is present, it may be that the problem is occurring outside the detection range of the diagnostic system.


Other materials:
Problem symptoms table
Hint:
if a normal code is displayed during the dtc check but the trouble still occurs,
check the circuits for each
symptom in the order given in the charts on the following pages and proceed to
the page given for troubleshooting.
The matrix chart is divided into 3 chapters.
If the instruc ...
Rear view monitor system precautions
■ Area displayed on screen
The rear view monitor system displays an image of the view from the bumper of
the rear area of the vehicle.
To adjust the image on the rear view monitor system screen.
• The area displayed on the screen may vary according to vehicle orientation
conditions.
...
Connecting a Bluetooth® audio player
► Registering an additional device
Select “Select Device” on the Bluetooth® audio control screen.
►Selecting a registered device
Select “Select Device” on the Bluetooth® audio control screen.
■Reconnecting a Bluetooth® phone
If the system cannot connect due to poor ...