Toyota Corolla (E210) 2019-2026 Owners Manual / Maintenance and care / Engine compartment / Adding engine oil
Toyota Corolla (E210): Adding engine oil
■ Checking the oil type and preparing the item needed
Make sure to check the oil type and prepare the items needed before adding oil.
- Engine oil selection
- Oil quantity (Low level mark
 Refill upper limit mark)
1.6 qt. (1.5 L, 1.3 Imp. qt.)
Refill upper limit mark)
1.6 qt. (1.5 L, 1.3 Imp. qt.) - Item
Clean funnel
■ Adding engine oil
If the oil level is below or near the low level mark, add engine oil of the same type as that already in the engine.
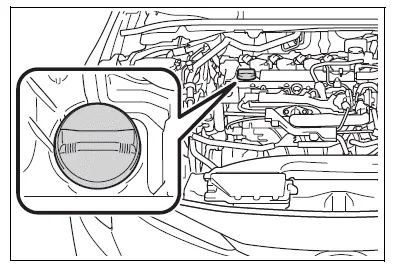
1. Remove the oil filler cap by turning it counterclockwise.
2. Add engine oil slowly, checking the dipstick.
Make sure that the oil level does not exceed the refill upper limit mark and is between the low level mark and refill upper limit mark.
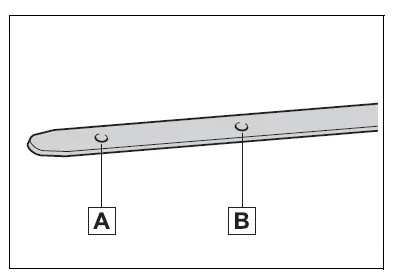
- Low level mark
- Refill upper limit mark
The shape of the dipstick may differ depending on the type of vehicle engine.
3. Install the oil filler cap by turning it clockwise.
WARNING
■Used engine oil
- Used engine oil contains potentially harmful contaminants which may cause skin disorders such as inflammation and skin cancer, so care should be taken to avoid prolonged and repeated contact. To remove used engine oil from your skin, wash thoroughly with soap and water.
- Dispose of used oil and filters
only in a safe and acceptable
manner. Do not dispose of used
oil and filters in household trash,
in sewers or onto the ground.
Call your Toyota dealer, service station or auto parts store for information concerning recycling or disposal.
- Do not leave used engine oil within the reach of children.
NOTICE
■When replacing the engine oil
- Be careful not to spill engine oil on the vehicle components.
- Avoid overfilling, or the engine could be damaged.
- Check the oil level on the dipstick every time you refill the vehicle.
- Be sure the engine oil filler cap is properly tightened.


Other materials:
If you think something is wrong
If you notice any of the following symptoms, your vehicle probably needs adjustment
or repair. Contact your Toyota dealer as soon as possible.
Visible symptoms
● Fluid leaks under the vehicle.
(Water dripping from the air conditioning after use is normal.)
● Flat-looking tires or u ...
Inspection procedure
1 Check p squib circuit(airbag sensor assy center – instrument
panel passenger airbag assy)
Disconnect the negative (–) terminal cable from the battery,
and wait at least for 90 seconds.
disconnect the connectors between the airbag sensor
assy center and the instrument panel ...
How to check and change detailed Bluetooth® settings
1 Display the “Bluetooth* Setup” screen.
2 Select “System Settings”.
3 The following screen is displayed:
1 Bluetooth® Power on/off
You can change Bluetooth® function on/off
2 Bluetooth® Name
3 Change PIN-code
4 Bluetooth® Address
5 Display Phone Status
You can set the system ...