Toyota Corolla (E120): Overhaul
Hint
:
- installation is in the reveres order of the removal. But the installation is indicated only when it has a point.
- In the rh side, work in the same procedure as in the lh side.
1. Remove rear armrest assy lh
- Using a screwdriver, remove the rear armrest.
Hint
: tape the screwdriver tip before use.
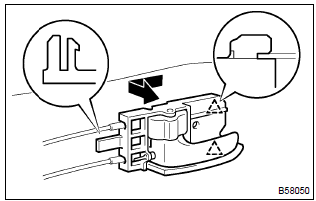
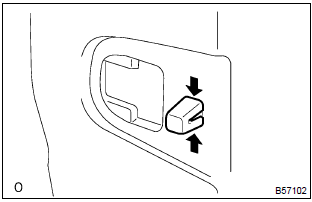
2. Remove power window regulator switch assy rear (w/ power window)
- Using a screwdriver, remove the power window regulator switch assembly.
Hint
: tape the screwdriver tip before use.
3. Remove rear door window regulator handle assy (w/o power window)
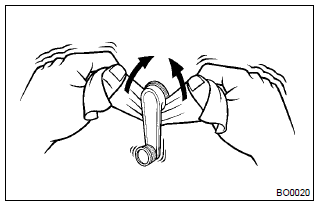
- Using a shop rag, remove the snap ring.
- remove the rear door window regulator handle and plate.
4. Remove rear door trim board sub–assy lh
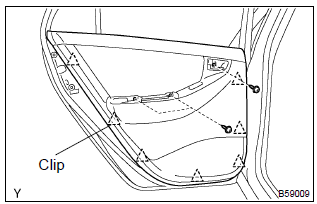
- Remove the 3 screws.
- using a screwdriver, disengage the clips, then pull the trim board upward to remove it.
Hint
: tape the screwdriver tip before use.
5. Remove rear door inside handle sub–assy lh
- Remove the inside handle and then disconnect the 2 cables from the inside handle.
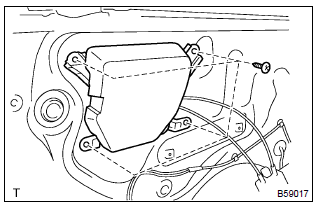
6. Remove rear door service hole cover lh
- disconnect each connector and remove the rear door service hole cover.
Notice
: remove the remaining tape on the body side.
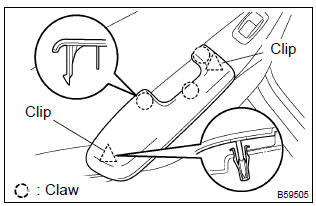
7. Remove rear door belt moulding assy lh
8. Remove rear door glass run lh
- remove the rear door glass run.
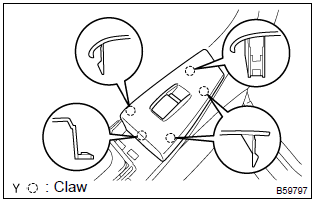
9. Remove rear door inside panel plate lh
- Remove the 4 screws and rear door inside panel plate.
10. Remove rear door window division bar sub–assy lh
- Remove the 2 bolts and screw.
- rotate the rear door window division bar by 90° and pull it upward, as shown in the illustration.
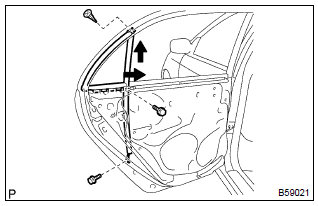
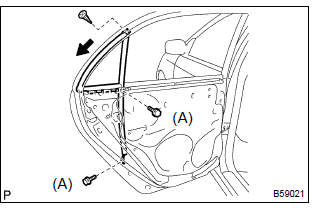
11. Remove rear door quarter window glass lh
- remove the rear door quarter window glass.
Notice
: do not damage the glass.
- remove the quarter window weatherstrip from the glass.
12. Remove rear door glass sub–assy lh
Hint
: insert a shop rag inside the door panel to prevent the glass from being scratched.
- open the door glass.
- tilt the door glass and disconnect the roller of the regulator from the channel to remove the door glass.
Notice
: do not damage the door glass.
Hint
: pull the glass upward to remove it.
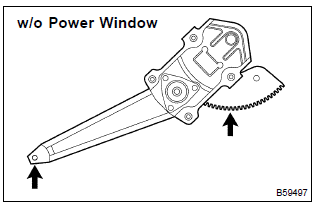
13. Remove rear door window regulator sub–assy lh (w/o power window)
- loosen the 4 bolts.
Notice
: when the bolts are removed, the rear door window regulator might drop and be deformed.
- remove the 4 bolts and rear door window regulator.
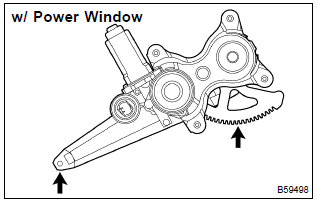
14. Remove rear door window regulator sub–assy lh (w/ power window)
- Disconnect the window regulator connector.
- loosen the 4 bolts.
Notice
: when the bolts are removed, the rear door window regulator might drop and be deformed.
- remove the 4 bolts and rear door window regulator.
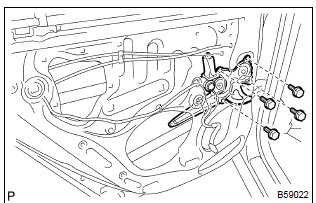
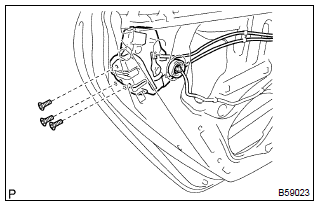
15. Remove power window regulator motor assy lh
- using a torx wrench (t30), remove the 3 screws and the motor assembly.
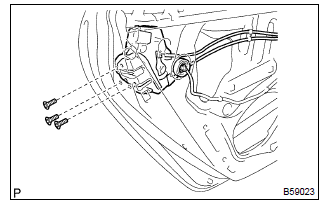
16. Remove rear door lock assy lh (w/o power door lock)
- using a torx wrench (t30), remove the 3 screws and the rear door lock assembly.
17. Remove rear door w/motor lock assy lh (w/ power door lock)
- Disconnect the power door lock connector.
- using a torx wrench (t30), remove the 3 screws and the power door lock assembly.
18. Remove rear door outside handle cover lh
- using a torx wrench (t30), loosen the screw and remove the rear door outside handle cover.
19. Remove rear door outside handle assy lh
- Pull and hold the release plate of the outside handle frame, as shown in the illustration.
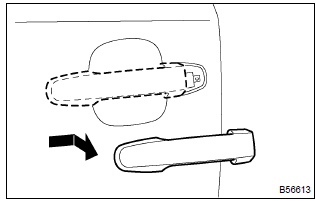
- Pushing the outside handle in the arrow mark direction as shown in the illustration, remove the outside handle.
Notice
: if the release plate is not pulled and held when removing the outside handle, then the release plate will interfere with the outside handle and it will damage the release plate.
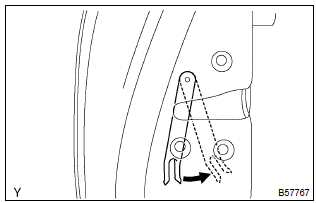
20. Remove rear door outside handle frame sub–assy lh
- Using a torx wrench (t30), loosen the screw.
- using pliers, disengage the clips and remove the outside handle frame, as shown in the illustration.
Notice
: be sure to remove the outside handle together with the clips, because the clips will be damaged if the clips remain attached to the door panel.
21. Remove rear door weatherstrip lh
- remove the door panel side bolt and disconnect the rear door check assembly.
- using a screwdriver, remove the weatherstrip.
Hint
: tape the screwdriver tip before use.
22. Install rear door weatherstrip lh
- install the weatherstrip.
- install the rear door check assembly with the door panel side
bolt.
Torque: 5.5 N·m (56 kgf·cm, 49 in.·Lbf)
23. Install rear door outside handle frame sub–assy lh
- using a torx wrench (t30), install the outside handle frame with
the screw.
Torque: 4.0 N·m (41 kgf·cm, 35 in.·Lbf)
24. Install rear door outside handle cover lh
- using a torx wrench (t30), install the outside handle cover with
the screw.
Torque: 4.0 N·m (41 kgf·cm, 35 in.·Lbf)
25. Install rear door lock assy lh (w/o power door lock)
- apply mp grease to the sliding and rotating parts of the door lock.
- apply adhesive to the 3 screws.
Part no.08833–00070, Three bond 1324 or equivalent
- using a torx wrench (t30), install the lock assembly with the 3
screws.
Torque: 5.0 N·m (51 kgf·cm, 44 in.·Lbf)
26. Install rear door w/motor lock assy lh (w/ power door lock)
- install a new door lock wire harness packing.
Notice
:
- if reusing the removed lock with rear door motor, the packing in the connecting part should be replaced with a new one.
- Be careful that no grease and dirt will stick to the packing surface in the connecting part.
- Reusing the removed packing or using a damaged packing will cause water to penetrate through the connecting part, and it will result in a malfunction of the door lock.
- engage the lock assembly with door motor with the release
plate of the outside handle, and then set it to the
door panel.
Notice
: make sure that the release plate of the outside handle frame is securely engaged with the lock assembly.
- apply mp grease to the sliding and rotating parts of the door lock.
- apply adhesive to the 3 screws.
Part no.08833–00070, Three bond 1324 or equivalent
- Using a torx wrench (t30), install the door lock assembly
with the 3 screws and bolt.
Torque: 5.0 N·m (51 kgf·cm, 44 in.·Lbf)
- connect the power door lock connector.
27. Install power window regulator motor assy lh (w/ power window)
- using a torx wrench (t30), install the power window regulator
motor assembly with the 3 screws.
Torque: 5.4 N·m (55 kgf·cm, 48 in.·Lbf)
28. Install rear door window regulator sub–assy lh (w/o power window)
- Apply mp grease to the sliding and rotating parts of the
window regulator.
Notice
: do not apply grease to the spring of the window regulator.
- install the rear door window regulator with the 4 bolts.
Torque: 8.0 N·m (82 kgf·cm, 71 in.·Lbf)
29. Install rear door window regulator sub–assy lh (w/ power window)
- Apply mp grease to the sliding and rotating parts of the
window regulator.
Notice
: do not apply grease to the spring of the window regulator.
- apply the window regulator to the 4 regulator installation holes on the front door panel, temporarily install the window regulator with the installation bolts.
- tighten the 4 bolts and the temporarily installed bolt.
Torque: 8.0 N·m (82 kgf·cm, 71 in.·Lbf)
- connect the window regulator connector.
30. Install rear door window division bar sub–assy lh
- Insert the door window division bar to the door panel, then rotate it by 90°.
- install the bolt and 3 screws.
Torque:
bolt a: 6.2 N·m (63 kgf·cm, 55 in.·Lbf)
31. Install rear door glass sub–assy lh (w/ power window)
Hint
: insert a shop rag inside the door panel to prevent the glass from being scratched.
- tilt the door glass and connect the roller of the regulator to the glass channel to install the door glass.
- inspect the power window operation.
- Connect the power window switch to the wire harness and turn the ignition switch on.
- Repeat up and down operation several times in the manual operation.
- Check if auto up "auto down operates in the automatic operation.
Hint
:
- note that the jam protection function does not operate just after resetting.
- Reset the regulator again when performing the reverse operation after closing the window fully in the auto up operation.
32. Inspect power window function (w/ power window)
33. Install rear door service hole cover lh
- install a new service hole cover to the door panel.
Hint
:
- when installing the service hole cover, pull out the links and connectors through the service hole cover.
- There should be no wrinkles or folds after attaching the service hole cover.
- After attaching the service hole cover, sealing condition should be confirmed.
34. Install rear door window regulator handle assy (w/o power window)
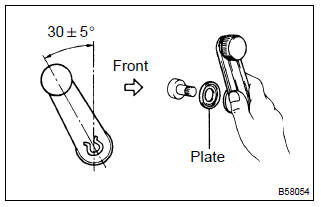
- Install the regulator handle with the snap ring.
Hint
: with the door window fully closed, install the plate and regulator handle with the snap ring as shown in the illustration.


Other materials:
Circuit description
The vehicle speed sensor circuit is sent to cruise control ecu assy as a
vehicle speed signal. For each rotation
of the shaft, the vehicle speed sensor sends a signal through the combination
meter assembly to the
cruise control ecu assy (see the following chart). The cruise control ecu assy
...
Problem symptoms table
Proceed to the reference page shown in the table below for each malfunction
symptom and troubleshoot
each circuit.
Hint:
troubleshooting of the tvip system is based on the premise that the door lock
control system and wireless
door lock control system is operating normally. Accordingly, be ...
Replacement
1. Drain brake fluid
Notice:
wash the brake fluid off immediately if it comes into contact with any painted
surface.
2. Remove air cleaner cap sub–assy
3. Remove air cleaner case sub–assy
remove the air cleaner element, then remove the 3 bolts and air
cleaner case sub–assy.
...