Toyota Corolla (E120) 2002–2008 Repair Manual / Heater & air conditioner / Refrigerant / On–vehicle inspection
Toyota Corolla (E120): On–vehicle inspection
1. Inspect refrigerant pressure with manifold gauge set
- this is a method in witch the trouble is located by using
a manifold gauge set. Read the manifold gauge pressure
when the these conditions are established.
Test conditions:
- temperature at the air inlet with the switch set at recirc is 30 – 35 °c (86 – 95 °f)
- engine running at 1500 rpm
- blower speed control switch at ”hi” position
- temperature control dial at ”cool” position a/c switch on
- fully open doors
- Normally functioning refrigeration system.
Gauge reading:
low pressure side:
0.15 – 0.25 Mpa (1.5 – 2.5 Kgf/cm2) high pressure side:
1.37 – 1.57 Mpa (14 – 16 kgf/cm2)
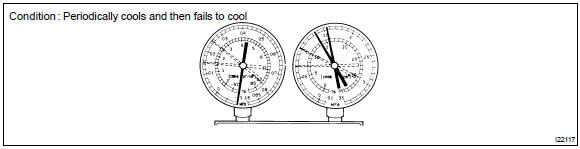
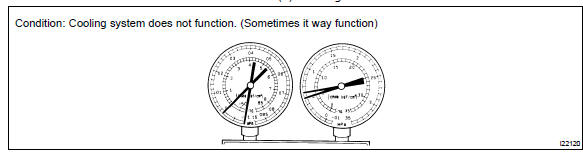
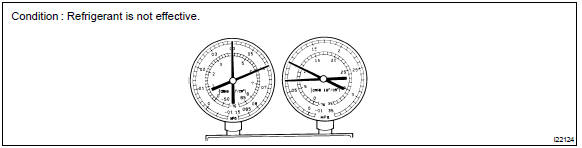
- Moisture present in refrigeration system.
|
Symptom |
Probable cause |
Diagnosis |
Remedy |
| During operation, pressure on low pressure side sometimes become a vacuum and sometime normal | Moisture in refrigerating system freezes at expansion valve orifice causing a temporary stop of cycle, however, when it melts, normal state is restored. |
|
|
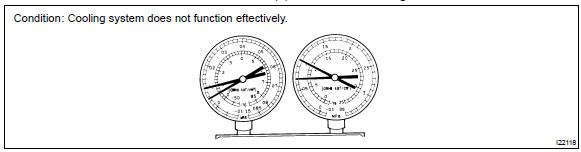
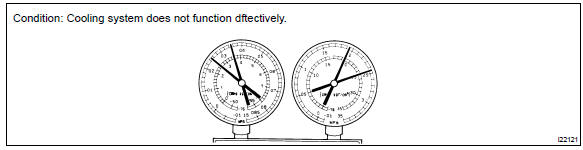
- Insufficient cooling
|
Symptom |
Probable cause |
Diagnosis |
Corrective actions |
|
Gas leakage in refrigeration system |
|
|
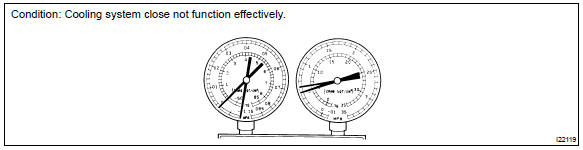
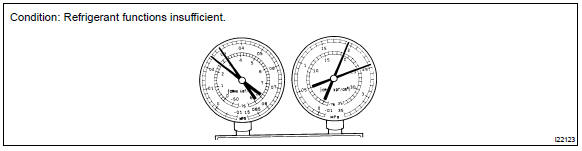
- Poor circulation of refrigerant
|
Symptom |
Probable cause |
Diagnosis |
Corrective actions |
|
Refrigerant flow obstructed by dirt in receiver | Receiver clogged | Replace condenser |
- Refrigerant does not circulate
|
Symptom |
Probable cause |
Diagnosis |
Corrective actions |
|
|
Refrigerant does not circulate |
|
- Refrigerant overcharged or insufficient cooling of condenser
|
Symptom |
Probable cause |
Diagnosis |
Corrective actions |
|
|
|
|
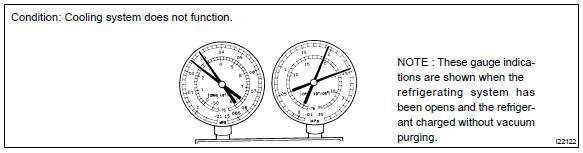
- Air present in refrigeration system
|
Symptom |
Probable cause |
Diagnosis |
Corrective actions |
|
Air entered in refrigerating system |
|
|
- Expansion valve improperly
|
Symptom |
Probable cause |
Diagnosis |
Corrective actions |
|
Trouble in expansion valve |
|
Check expansion valve |
- Defective compression compressor
|
Symptom |
Probable cause |
Diagnosis |
Corrective actions |
|
Internal leak in compressor |
|
Repair or replace compressor |
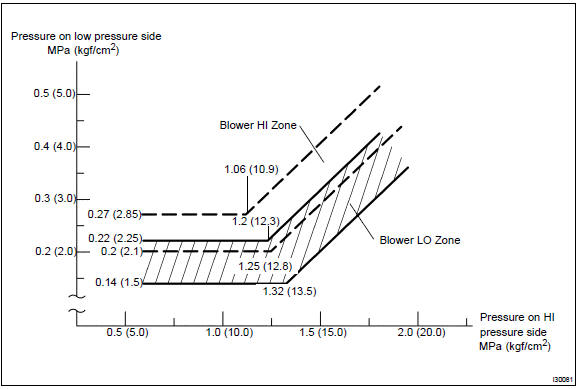
Gauge readings (reference)


Other materials:
Outside vehicle
General maintenance
Performing these maintenance checks on the vehicle in the owner’s
responsibility. The owner may
perform the maintenance or take the vehicle to a service center.
Check the parts of the vehicle described below on a daily basis. In most cases,
special tool are not
requir ...
Entire combination meter does not operate
Wiring diagram
Inspection procedere
1 Check fuse
Check that continuity exists of dome fuse.
check that continuity exists of gauge fuse.
check that continuity exists of am1 fuse.
2 Inspect combination meter assy
Check continuity.
Disconnect the ” ...
Rear axle beam assy
Replacement
Hint: components:
1. Remove rear wheel
remove the rh and lh rear wheels.
2. Remove rear brake drum sub–assy
3. Separate skid control sensor wire
Disconnect the skid control sensor connector.
remove the 2 bolts and separate the wire harness
clamp ...