Toyota Corolla (E120) 2002–2008 Repair Manual / Drive shaft / propeller shaft / Drive shaft, propeller shaft, axle / On–vehicle inspection
Toyota Corolla (E120): On–vehicle inspection
1. Inspect front axle hub bearing
- remove the front wheel.
- separate the front disc brake caliper assy .
- remove the front disc.
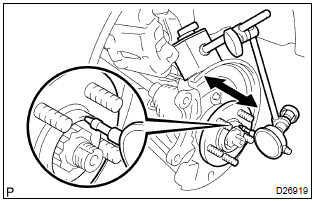
- inspect the bearing backlash.

- Using a dial indicator, check the backlash near the
center of the axle hub.
Maximum: 0.05 Mm (0.0020 In.)
If the backlash exceeds the maximum, replace the front axle hub bearing.
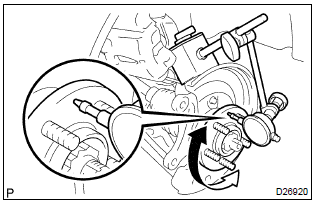
- inspect the axle hub deviation.

- Using a dial indicator, check the deviation at the surface
of the axle hub outside the hub bolt.
Maximum: 0.05 Mm (0.0020 In.)
If the backlash exceeds the maximum, replace the front axle hub sub–assy.
- install the front disc.
- install the front disc brake caliper assy .
- install the front wheel.
Torque: 103 nvm (1,050 Kgf·cm, 76 ft·lbf)
2. Inspect rear axle hub bearing
- remove the rear wheel.
- remove rear brake drum sub–assy.
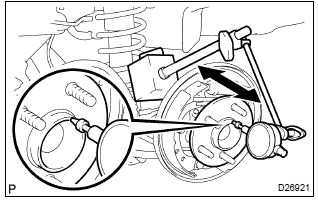
- inspect the bearing backlash.

- Set a dial indicator near the center of the axle hub
and check the backlash in the bearing shaft sirection.
Maximum: 0.05 Mm (0.0020 In.)
If the backlash exceeds the maximum, replace the rear axle hub & bearing assy.
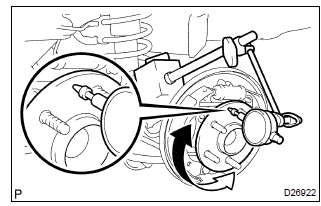
- Inspect the axle hub deviation.

- Using a dial indicator, check the deviation at the surface
of the axle hub outside the hub bolt.
Maximum: 0.07 Mm (0.0028 In.)
If the backlash exceeds the maximum, replace the rear axle hub & bearing assy.
- install the rear brake drum sub–assy.
- install the rear wheel.
Torque: 103 nvm (1,050 Kgf·cm, 76 ft·lbf)
Other materials:
Replacement
1. Discharge refrigerant from refrigeration system
turn the a/c switch on.
operating the cooler compressor at the engine rpm of approx. 1000
For 5 to 6 min., Circulate the refrigerant
and collect compressor oil remaining in each component into the cooler
compressor as much ...
Wiper & washer
Preparation
Sst
Recomended tools
Equipment
...
Warning lights and indicators
The warning lights and indicators on the instrument cluster,
center panel, overhead console and outside rear view mirrors inform the driver
of the status of the vehicle's various systems.
Warning lights and indicators displayed on the instrument
cluster
For the purpose of explanation, the followin ...


