Toyota Corolla (E210) 2019-2026 Owners Manual / Interior features / Using the air conditioning system and defogger / Heated steering wheel/seat heaters
Toyota Corolla (E210): Heated steering wheel/seat heaters
- Heated steering wheel
Warms up the grip of the steering wheel
- Seat heaters
Warm up the seat upholstery
WARNING
To prevent minor burn injuries
Care should be taken if anyone in the following categories comes in contact with the steering wheel or seats when the heater is on:
- Babies, small children, the elderly, the sick and the physically challenged
- Persons with sensitive skin
- Persons who are fatigued
- Persons who have taken alcohol or drugs that induce sleep (sleeping drugs, cold remedies, etc.)
NOTICE
■To prevent damage to the seat heaters
Do not put heavy objects that have an uneven surface on the seat and do not stick sharp objects (needles, nails, etc.) into the seat.
■To prevent battery discharge
Do not use the functions when the engine is off.
Operation instructions
■ Heated steering wheel
Turns heated steering wheel on/off
When the heated steering wheel is on, the indicator illuminates on the heated steering wheel switch.

■ Seat heaters
Front
Turns seat heaters on/off
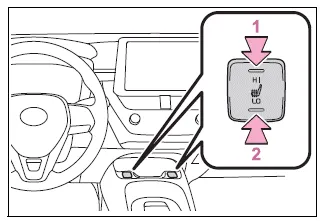
- High temperature
- Low temperature
When the seat heater is on, the indicator illuminates on the seat heater switch.
When not in use, put the switch in the neutral position. The indicator will turn off.
Rear
Turns seat heaters on/off
When the seat heater is on, the indicator illuminates on the seat heater switch.

■The heated steering wheel and seat heaters can be used when
The engine switch is in ON.
WARNING
■To prevent overheating and minor burn injuries
Observe the following precautions when using the seat heaters.
- Do not cover the seat with a blanket or cushion when using the seat heater.
- Do not use seat heater more than necessary.


Other materials:
Circuit description
The actuator motor is operated by signals from the cruise control ecu assy.
Acceleration and deceleration
signals are transmitted by changes in the duty ratio (see below).
Duty ratio:
the duty ratio is the ratio of the period of continuity in one cycle. For
example, if a is the period of co ...
On–vehicle inspection
1. Inspect speedometer
check the operation.
Using a speedometer tester, inspect the speedometer fro allowable
indication error and check
the operation of the odometer.
Reference:
Notice:
tire wear and tire over or under inflation will increase the indication error.
...
Inspection procedure
Hint:
start the inspection from step 1 in case of using the hand–held tester and start
from step 2 in case of not
using hand–held tester.
1 Inspect brake actuator assy
Select the datalist mode on the hand–held tester.
check the operation sound of the abs pump motor when operat ...