Toyota Corolla (E120) 2002–2008 Repair Manual / Diagnostics / Combination meter / How to proceed with troubleshooting
Toyota Corolla (E120): How to proceed with troubleshooting
1 Vehicle brought to workshop

2 Customer problem analysis

3 Problem symptom confirmation

4 Circuit inspection

5 Repair or replace

6 Confirmation test

7 End
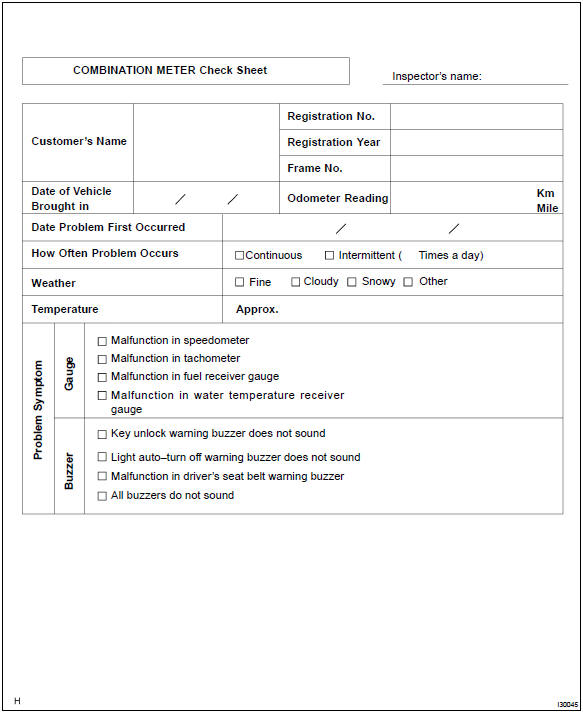
Customer problem analysis check


Other materials:
Inspection procedure
1 Inspect shift solenoid valve(sl)
Remove the shift solenoid valve sl.
measure the resistance according to the value(s) in the
table below.
Standard:
Connect the positive (+) battery lead to the solenoid connector
terminal, and the negative (–) battery lead to the
so ...
Circuit description
The airbag sensor assy center consists of a airbag sensor assy center, safing
sensor, drive circuit, diagnosis
circuit and ignition control, etc.
It receives signals from the airbag sensor, judges whether or not the srs must
be activated, and detects
diagnosis system malfunction.
Dtc b11 ...
Heater control & accessory assy
Replacement
1. Remove console panel upper
2. Remove instrument cluster finish panel
3. Remove heater control & accessory assy
Release the 2 fitting claws and pull out the heater control
& accessory assy.
Using a screwdriver, open the claw of the cable clamp and
dis ...