Toyota Corolla (E210): Selecting tire chains
Use the correct tire chain size when mounting the tire chains.
Chain size is regulated for each tire size.
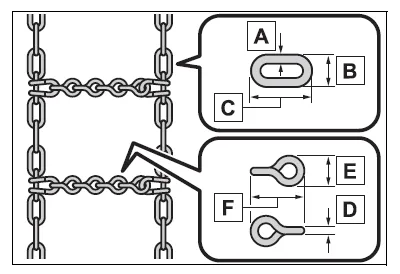
- Side chain (0.12 in. [3 mm] in diameter)
- Side chain (0.39 in. [10 mm] in width)
- Side chain (1.18 in. [30 mm] in length)
- Cross chain (0.16 in. [4 mm] in diameter)
- Cross chain (0.55 in. [14 mm] in width)
- Cross chain (0.98 in. [25 mm] in length)
Regulations on the use of tire chains
Regulations regarding the use of tire chains vary depending on location and type of road.
Always check local regulations before installing chains.
■Tire chain installation
Observe the following precautions when installing and removing chains:
- Install and remove tire chains in a safe location.
- Install tire chains on the front tires only. Do not install tire chains on the rear tires.
- Install tire chains on the front tires as tightly as possible. Retighten chains after driving 1/4-1/2 mile (0.5-1.0 km).
- Install tire chains following the instructions provided with the tire chains.
NOTICE
■Fitting tire chains (vehicles with a tire pressure warning system)
The tire pressure warning valves and transmitters may not function correctly when tire chains are fitted.


Other materials:
Body panel sealing areas
Be sure to apply body sealer to the body panel joints and door edges (tip of
outer panel folded part), etc., To waterproof
and rustproof them.
Hint:
apply degreasing agent to a clean cloth and clean the sealer
application areas.
After removing the applied spot sealer from the se ...
On–vehicle inspection
1. Check basic function (manual operation function)
turn the ignition switch on.
Check that the door glass moves up when each window switch of the
regulator master switch
assembly is turned up and moves down when each window switch is turned down.
Check that the do ...
Replacement
Hint: components:
1. Precaution
2. Disconnect battery negative terminal
3. Remove horn button assy
Place the front wheels facing straight ahead.
using a torx socket wrench (t30), loosen the 2 torx
screws until the groove along the screw circumference
catches on the screw ca ...