
Toyota Corolla (E120): Replacement
Hint
: components:
1. Precaution
2. Disconnect battery negative terminal
3. Remove horn button assy
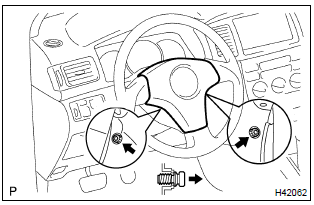
- Place the front wheels facing straight ahead.
- using a torx socket wrench (t30), loosen the 2 torx screws until the groove along the screw circumference catches on the screw case.
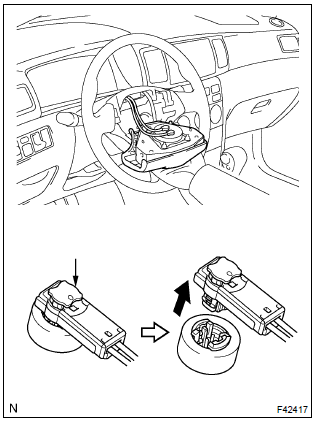
- Pull out the horn button assy from the steering wheel assy.
- using a screwdriver, release the lock part of each airbag connector and disconnect the 2 airbag connectors.
4. Inspect horn button assy
5. Install horn button assy
- connect the airbag connectors and horn connector.
- install the horn button assy after confirming that the circumference groove of the torx screws is caught on the screw case.
- using a torx socket wrench (t 30), install the 2 screws.
Torque: 8.8 Nvm (90 kgfvcm, 78 in.Vlbf)
6. Inspect srs warning light


Other materials:
Rear seats
The seatbacks of the rear
seats can be folded down.
Folding down the rear
seatbacks
1. Move the front seats forward.
2. Stow the rear armrest. (if
equipped).
3. Fold the seatback down while
pushing the seatback lock
release button.
Each seatback may be folded separately.
WARNING
Observe the follo ...
Seat belt warning lamp for front passenger’s seat
does not flash
Wiring diagram
Inspection procedure
1 Inspect combination meter assy
Ground terminal c9–11 on the combination meter side.
check that the warning lightlights up.
Ok: warning light lights up.
2 Inspect passenger seat belt warning lamp assy
Ground terminal c9– ...
Overhaul
1. Remove w/head taper screw plug no.2
Using a socket hexagon wench 10, remove the taper
screw plug and gasket.
2. Remove valve lifter
Remove the valve lifters from the cylinder head.
3. Remove valve
Place the cylinder head on wooden blocks.
using sst, compres ...