Toyota Corolla (E210) 2019-2025 Owners Manual / Before driving / Adjusting the seats / Head restraints
Toyota Corolla (E210): Head restraints
Head restraints are provided for all seats.
WARNING
■Head restraint precautions
Observe the following precautions regarding the head restraints.
Failure to do so may result in death or serious injury.
- Use the head restraints designed for each respective seat.
- Adjust the head restraints to the correct position at all times.
- After adjusting the head restraints, push down on them and make sure they are locked in position.
- Do not drive with the head restraints removed.
Adjusting a head restraint
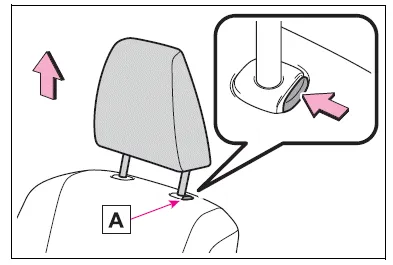
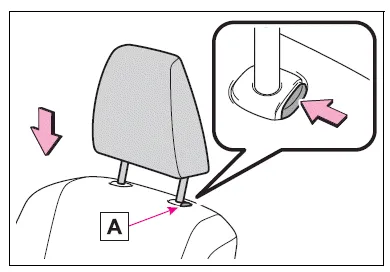
■ Front seats

- Up
Pull the head restraints up. - Down
Push the head restraint down while pressing the lock release button A.
■ Rear seats
Head restraints cannot be adjusted or removed.
■Adjusting the height of the head restraints (front seats)
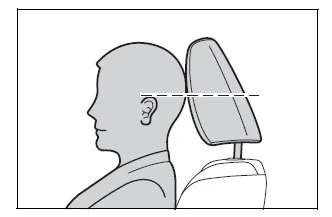
Make sure that the head restraints are adjusted so that the center of the head restraint is closest to the top of your ears.
Removing the head restraints
■ Front seats
Pull the head restraint up while pressing the lock release button A.
■ Rear seats
Head restraints cannot be adjusted or removed.
Installing the head restraints
■ Front seats
Align the head restraint with the installation holes and push it down to the lock position.
Press and hold the lock release button A when lowering the head restraint.
■ Rear seats
Head restraints cannot be adjusted or removed.


Other materials:
Inspection
1. Inspect sliding roof limit switch
Inspect the sliding roof limit switch continuity.
Standard:
If the continuity is not as specified, replace the switch.
2. Inspect sliding roof drive gear sub–assy
Connect the positive (+) lead from the battery to terminal
2 and the ne ...
Circuit description
When driving uphill under cruise control, in order to reduce the number of
shifting due to on–off overdrive
operation and to provide smooth driving, when down shifting in the
electronically controlled transmission occurs,
a signal to prevent upshift until the end of the uphill slope is sent ...
Inspection
1. Charcoal canister assy
Visually check the charcoal canister for cracks or damage.
Inspect the charcoal canister operation.
Plug the vent port with the cap.
While holding the purge port closed, blow air (1.76
Kpa, 18 gf/cm2, 0.26 Psi) into the evap port and
...