Toyota Corolla (E120) 2002–2008 Repair Manual / Fuel / Fuel system
Toyota Corolla (E120): Fuel system
Precaution
1. Before working on fuel system, disconnect negative (–) terminal cable from battery
2. Do not smoke or work near an open flame when working on fuel system
3. Keep gasoline away from rubber or leather parts
4. Work for prevent gasoline from spilling out
- Remove the rear seat cushion.
(, 72–8)
- remove rear floor service hole cover.
- disconnect the fuel pump connector.
- start the engine. After the engine has stopped on its own, turn the ignition switch to lock.
- disconnect negative (–) terminal cable from battery.
- connect the fuel pump connector.
- install rear floor service hole cover.
- install the rear seat cushion.
5. Fuel system
- When disconnecting the high fuel pressure line, a large amount of gasoline will spill out, so observe these procedures.
- Work for prevent gasoline from spilling out.
- Disconnect the fuel tank main tube.
- Drain the fuel remained inside the fuel tank main tube.
- Protect the disconnected fuel tank main tube from damage and foreign material by covering it with a vinyl bag.
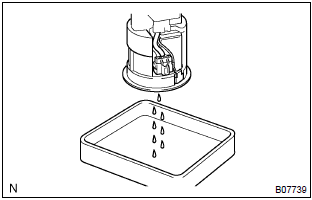
- Put a container under the connection.
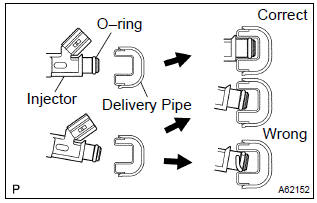
- Observe these precautions when removing and installing the fuel injector.
- Never reuse an o–ring.
- When placing a new o–ring on the fuel injector, take care not to damage it in any way.
- Coat a new o–ring with spindle oil or gasoline before installing.
Notice
: never use engine, gear or brake oil.
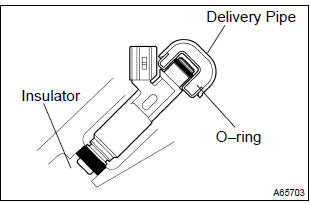
- Install the fuel injector to the fuel delivery pipe and cylinder head, as shown in the illustration. Before installing the fuel injector, be sure to apply spindle oil or gasoline on the place where the fuel delivery pipe touches an o–ring of the fuel injector.
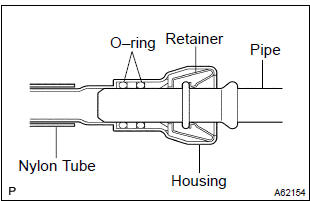
- Observe these precautions when disconnecting the fuel delivery pipe.
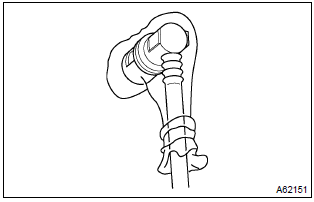
Hint
: the structure of the metallic connector is shown as illustration.
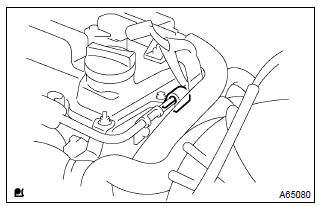
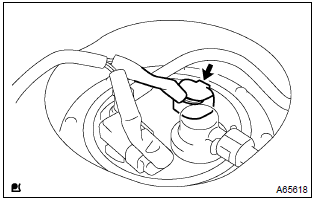
- Remove the efi fuel pipe clamp.
- Get the metallic connector of the fuel tube assembly, pull it out towards the rear and hold it as it is.
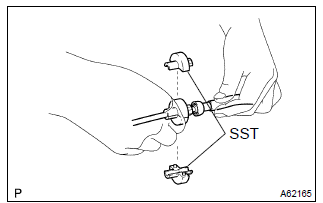
- Assemble sst to the connection as shown.
Sst 09268–21010
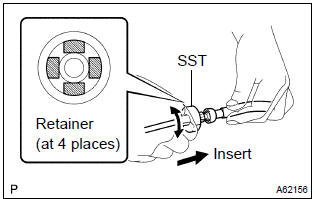
- Turn sst, align the retainers inside the connector with sst chamfered parts and insert sst into the connector.
- Slide sst and the connector together towards the fuel tube assembly.
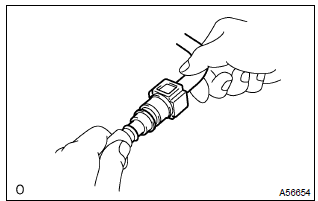
- Observe these precautions when disconnecting the fuel tube connector (quick type).
- Remove the efi fuel pipe clamp.
- Check if there is any dirt like mud on the pipe and around the connector before disconnecting them and clean the dirt away.
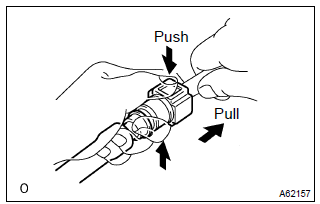
- Be sure to disconnect with hands.
- When the connector and the pipe are stuck, pinch
the retainer between the hands, push and pull the
connector to free to disconnect and pull it out.
Notice
: do not use any tool at this time.
- Inspect if there is any dirt or the likes on the seal surface of the disconnected pipe and clean it away.
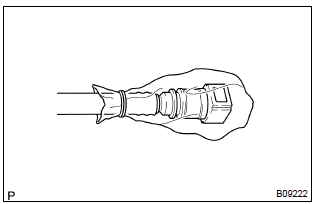
- Prevent the disconnected pipe and connector from damaging and mixing foreign objects by covering them with a vinyl bag.
- Observe these precautions when connecting the fuel tube connector (quick type).
- Match the axis of the connector with axis of the pipe, and push in the connector until retainer makes a ”click” sound. In case that the connections is tight, apply little amount of new engine oil on the tip of the pipe.
- After having finished the connection, check if the pipe and the connector are securely connected by pulling them.
6. Check fuel leak
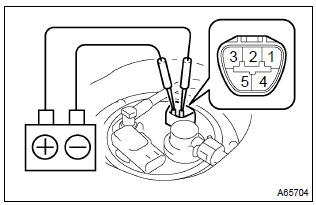
- Check that there are no fuel leaks after doing maintenance anywhere on the fuel system.
- Connect the hand–held tester to the dlc3.
- Turn the ignition switch on and hand–held tester main switch on.
- Select the active test mode on the hand–held tester.
- Please refer to the hand–held tester operator’s manual for further details.
- If you have no hand–held tester, connect the positive (+) and negative (–) leads from the battery to the fuel pump connector.
- Check that there are no leaks from any part of the fuel system.
- Turn the ignition switch to lock.
- Disconnect the hand–held tester from the dlc3.


Other materials:
Circuit description
The srs warning light is located on the combination meter.
When the srs is normal, the srs warning light lights up for approx. 6 Seconds
after the ignition switch is
turned from the lock position to on position, and then turns off automatically.
If there is a malfunction in the srs, the srs ...
Other functions
■ Switching between outside air and recirculated air modes
Press .
The mode switches between outside air mode (indicator off) and recirculated air
mode (indicator on) each time is pressed.
■ Defogging the windshield
Defoggers are used to defog the windshield and front side windows ...
No sound is heard from speaker in all modes
Wiring diagram
Inspection procedure
1 Check lcd (liquid crystal display) for lighting
Lcd illumination check
turn the ignition switch acc.
Turn the radio receiver assembly on.
Standard: lcd illumination of the radio receiver assembly light.
2 Control fader and ...