Toyota Corolla (E210) 2019-2026 Owners Manual / Maintenance and care / Checking and replacing fuses
Toyota Corolla (E210): Checking and replacing fuses
If any of the electrical components do not operate, a fuse may have blown. If this happens, check and replace the fuses as necessary.
Checking and replacing fuses
1. Turn the engine switch off.
2. Open the fuse box cover.
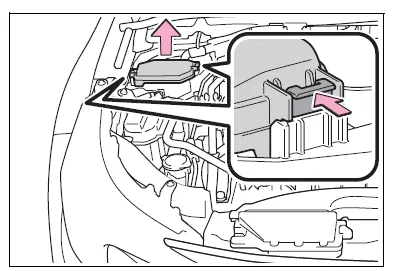
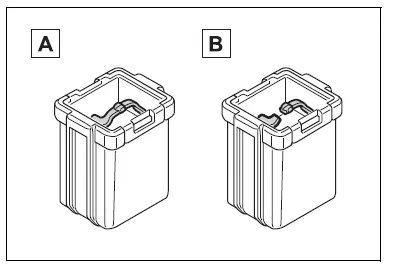
Engine compartment: type A fuse box
Push the tabs in and lift the lid off.
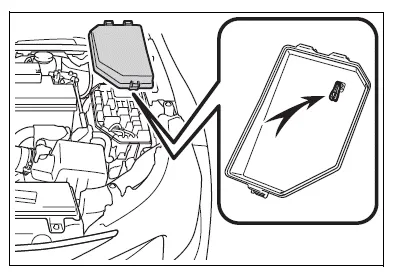
Engine compartment: type B fuse box
Push the tabs in and lift the lid off.

Under the driver's side instrument panel
Remove the lid.
Make sure to push the claw when removing/installing the lid.

3. Remove the fuse with the pullout tool.
Only type A fuse can be removed using the pullout tool.
4. Check if the fuse is blown.
Replace the blown fuse with a new fuse of an appropriate amperage rating. The amperage rating can be found on the fuse box lid.
Type A
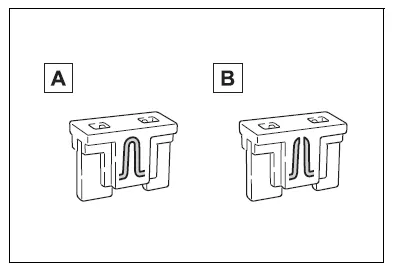
- Normal fuse
- Blown fuse
Type B
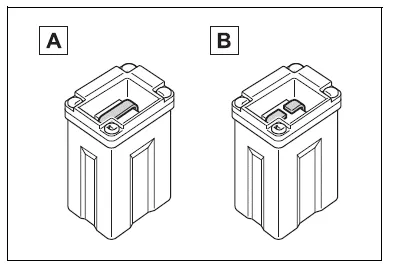
- Normal fuse
- Blown fuse
Type C
- Normal fuse
- Blown fuse
Type D
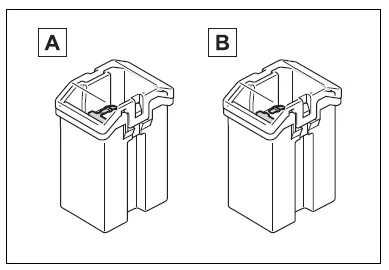
- Normal fuse
- Blown fuse
Type E
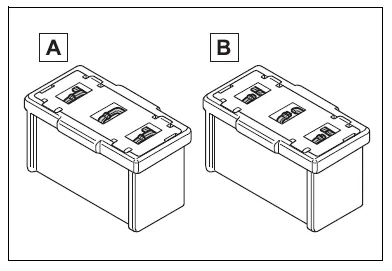
- Normal fuse
- Blown fuse
■After a fuse is replaced
- When installing the lid, make sure that the tab is installed securely.
- If the lights do not turn on even after the fuse has been replaced, a bulb may need replacement.
- If the replaced fuse blows again, have the vehicle inspected by your Toyota dealer.
■If there is an overload in a circuit
The fuses are designed to blow, protecting the wiring harness from damage.
■When replacing light bulbs
Toyota recommends that you use genuine Toyota products designed for this vehicle.
Because certain bulbs are connected to circuits designed to prevent overload, non-genuine parts or parts not designed for this vehicle may be unusable.
WARNING
■To prevent system breakdowns and vehicle fire
Observe the following precautions.
Failure to do so may cause damage to the vehicle, and possibly a fire or injury.
- Never use a fuse of a higher amperage rating than that indicated, or use any other object in place of a fuse.
- Always use a genuine Toyota
fuse or equivalent.
Never replace a fuse with a wire, even as a temporary fix.
- Do not modify the fuses or fuse boxes.
NOTICE
■Before replacing fuses
Have the cause of electrical overload determined and repaired by your Toyota dealer as soon as possible.


Other materials:
Inspection procedure
1 Inspect transmission wire(s2)
Disconnect the transmission wire connector from the
transaxle.
measure the resistance according to the value(s) in the
table below.
Standard:
2 Check harness and connector(transmission wire – ecm)
Connect the transmission connec ...
Checking and adding the
brake fluid
■ Checking fluid level
The brake fluid level should be
between the "MAX" and "MIN"
lines on the tank.
■ Adding fluid
1. Slide and lift up the rubber
strip to partly remove it as
shown.
2. Disconnect the claws and
remove the service cover.
3. Remove the reservoir cap.
4. Add brake fluid slowl ...
Air outlet layout and operations
■ Location of air outlets
The air outlets and air volume
changes according to the
selected air flow mode.
:If equipped
■ Adjusting the position of
and opening and closing
the air outlets
Front center
Direct air flow to the left or right, up
or down
Front right-hand side
Direct air flow to th ...