Toyota Corolla (E120) 2002–2008 Repair Manual / Diagnostics / Cruise control system / Stop light switch circuit / Circuit description
Toyota Corolla (E120): Circuit description
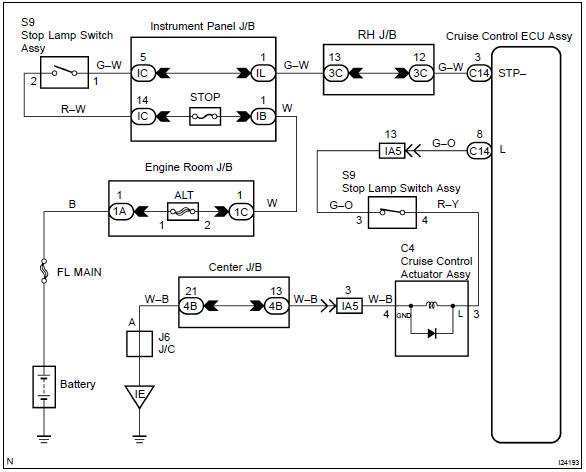
When the brake pedal is depressed, the stop lamp switch assy sends a signal to the cruise control ecu assy.
When the cruise control ecu assy receives this signal, it cancels the cruise control.
A fail–safe function is provided so that cancel functions normally, even if there is a malfunction in the stop light switch circuit.
The cancel conditions are: battery positive voltage at terminal stp–.
When the brake pedal is depressed, normal battery positive voltage normally is applied through the stop fuse and stop lamp switch assy to terminal stp– of the cruise control ecu assy, and the cruise control ecu assy turns the cruise control to off.
If the harness connected to terminal stp– has an open circuit, terminal stp– will have battery positive voltage and the cruise control will be turned off.
Also, when the brake pedal is depressed, the magnetic clutch circuit is cut mechanically by the stop lamp switch assy, turning the cruise control off.
Wiring diagram


Other materials:
Inspection procedure
1 Inspect cruise control actuator assy
Inspect the cruise control actuator arm locking operation.
Turn the ignition switch to off.
Disconnect the cruise control actuator assy connector.
Connect the positive (+) lead from the battery to the
terminal 3 (l) of crui ...
Replacement
Hint:
for parking brake cable assy no.2, Perform the same procedure to the parking
brake cable assy no.3.
1. Remove rear wheel
2. Remove rear brake drum sub–assy
3. Remove rear brake automatic adjust lever lh
4. Remove front brake shoe
sst 09718–00010
5. Remove parking brake sho ...
Registering a new contact to the contact list
New contact data can be registered. Up to 4 numbers per person can be registered.
For PBAP compatible Bluetooth® phones, this function is available when “Automatic
Contact/History Transfer” is set to off.
1 Select “New Contact”.
2 Enter the name and select “OK”.
3 Enter the phone ...