Toyota Corolla (E120) 2002–2008 Repair Manual / Diagnostics / Audio system / Although system is powered,cd cannot be played
Toyota Corolla (E120): Although system is powered,cd cannot be played
Wiring diagram
Inspection procedure
1 Check if a proper cd is inserted
- Check that a proper cd is inserted.
- Make sure that the cd is a normal audio cd, and that there is no
deformation, flaw, stain, burr
and other defects on the cd.
Standard: normal audio cd.
Reference:
- translucent or different–shaped cd cannot be played.
- Cd–rom for personal computers (with music recorded in) and recorded cd–r may not be played.
- Playing an 3.2 In. (8–Cm) cd does not require an adapter.


2 Check that a proper cd is inserted
- Check that a proper cd is inserted.
- Check whether or not the cd is inserted upside down.
Standard: not upside down.


3 Disc cleaning
- Disk cleaning
- if the disk gets dirty, clean the disk by wiping the surface from the center to outside in the radial directions with a soft cloth.
Notice
: do not use a conventional record cleaner or anti–static preservative.


4 Replace cd with another and recheck
- Replace the cd with another and recheck.
- Replace the faulty cd with the normal one to see if the same trouble
occurs again.
Standard: malfunction disappear.


5 Check if radio auto–search functions properly
- Check if the radio auto–search function properly.
- Perform the auto–research of the radio and check that the
operation is normal.
Standard: malfunction disappear.


6 Did the temperature in the cabin change rapidly?
- Did the temperature in the cabin change rapidly?
- Check whether or not the rapid temperature change occurred in the
cabin.
Standard: the rapid temperature change occurred.
Reference: the rapid temperature change creates condensation inside the cd player, which may disable playing cd.


Check and replace radio receiver assy
7 Inspect radio receiver assy(+b, acc, gnd)
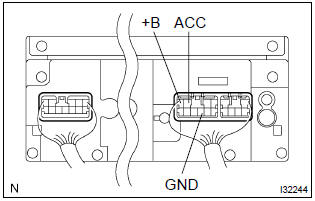
- Check that the continuity between terminals at each condition, as shown in the chart.
Standard:

- Check that the voltage between terminals at each condition, as shown in the chart.
Standard:


Repair or replace harness or connector


Other materials:
On–vehicle inspection
Notice:
”cold” and ”hot” in these sentences express the temperature of the coils
themselves. ”Cold” is from
–10 c (14 f) to 50 c (122 f) and ”hot” is from 50 c (122 f) to 100 c (212 f).
1. Inspect ignition coil (with igniter) and spark test
confirm dtc.
Notice:
...
Receiving a call
When a call is received, the following screen is displayed together with a
sound.
To answer the phone
Press the switch on the steering
wheel or select .
To refuse a call
Press the switch on the steering
wheel or select .
To adjust the incoming call volume
Turn the “PWR/VOL” knob. ...
Hydraulic test
1. Perform hydraulic test
Measure the line pressure.
Notice:
Do the test at normal operation atf temperature 50 to 80 °c (122 to
176 °f).
The line pressure test should always be carried out in pairs. One
technician should observe
the conditions of wheels or wheel stopper outsi ...