Toyota Corolla (E120): Cd cannot be taken out
Wiring diagram
Inspection procedure
1 Check if radio auto–search functions properly
- Check if the radio auto–search function properly.
- Perform the auto–research of the radio and check that the
operation is normal.
Standard: malfunction disappear.


2 Press ”eject” and check operation
- Press ”eject”and check the operation.
- Press the cd eject switch of the radio receiver assembly for 2 sec
or more to see if the cd is
ejected.
Standard: cd is ejected.
Reference: if the cd is not ejected, send the vehicle for repair.
Do not try to drag it out by force.


3 Check if a proper cd is inserted
- Check that a proper cd is inserted.
- Check that in what conditions the sound skipping occurs.
Standard: driving on the bad road.


4 Replace cd with another and recheck
- Replace the cd with another and recheck.
- Check the installation condition of the radio receiver assembly.
Standard: installed properly.


5 Inspect radio receiver assy(+b, acc, gnd)
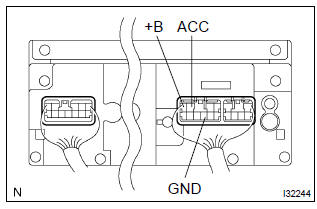
- Check that the continuity between terminals at each condition, as shown in the chart.
Standard:

- Check that the voltage between terminals at each condition, as shown in the chart.
Standard:


Repair or replace harness or connector


Other materials:
Inspection
1. Cooler thermistor no.1
Check resistance between terminals 1 and 2 of cooler
thermistor no. 1 At each temperature, as shown in the
chart.
Resistance:
If resistance value is not as specified, replace the sensor.
2. Cooler and accessory assy
Inspect blower switch contin ...
Wiper & washer
Preparation
Sst
Recomended tools
Equipment
...
Circuit description
Refer to dtc p0130
Dtc no.
Dtc detection condition
Trouble area
P0133
After engine has been warmed up, if response time that heated
oxygen sensor’s output voltage reaches from rich to lean.
Or from lean to rich, is 0.6 Second or more during idling.
...