
Toyota Corolla (E170) 2014–2019 Owners Manual / Vehicle specifications / Specifications / Tire information
Toyota Corolla (E170): Tire information
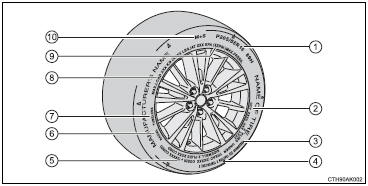
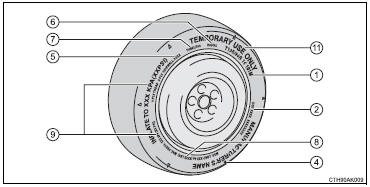
Typical tire symbols
► Full-size tire
► Compact spare tire
1 Tire size
2 DOT and Tire Identification Number (TIN)
3 Uniform tire quality grading
For details, see “Uniform Tire Quality Grading” that follows.
4 Location of treadwear indicators 5 Tire ply composition and materials Plies are layers of rubber-coated parallel cords. Cords are the strands which form the plies in a tire.
6 Radial tires or bias-ply tires A radial tire has “RADIAL” on the sidewall. A tire not marked “RADIAL” is a bias-ply tire.
7 TUBELESS or TUBE TYPE
A tubeless tire does not have a tube and air is directly put into the tire. A tube
type tire has a tube inside the tire and the tube maintains the air pressure.
8 Load limit at maximum cold tire inflation pressure 9 Maximum cold tire inflation pressure This means the pressure to which a tire may be inflated.
10 Summer tires or all season tires An all season tire has “M+S” on the sidewall. A tire not marked “M+S” is a summer tire.
11 “TEMPORARY USE ONLY”
A compact spare tire is identified by the phrase “TEMPORARY USE ONLY” molded on
its sidewall. This tire is designed for temporary emergency use only.
- Typical DOT and Tire Identification Number (TIN)
- Tire size
- Tire section names
- Uniform Tire Quality Grading
- Glossary of tire terminology


Other materials:
Overhaul
1. Precaution
2. Disconnect battery negative terminal
3. Inspect place front wheels facing straight ahead
4. Remove horn button assy
Notice:
if the airbag connector is disconnected with the ignition
switch being at on, dtcs will be recorded.
using a torx socket wrench, loosen the ...
Check mode procedure
Hint:
hand–held tester only:
compared to the normal mode, the check mode has more sensing
ability to detect malfunctions. Furthermore, the same diagnostic
items which are detected in the normal mode can also be
detected in the check mode.
1. Check mode procedure(using the hand–held tester) ...
Replacement
Hint: components:
1. Place front wheels facing straight ahead
2. Remove front wheels
3. Remove engine under cover lh
4. Remove engine under cover rh
5. Remove exhaust pipe
6. Drain transaxle oil
7. Remove hood sub–assy
8. Remove cylinder head cover no.2
9. Remove air cleaner assy
10. R ...