Toyota Corolla (E120) 2002–2008 Repair Manual / Emission control / Timing gear cover oil seal
Toyota Corolla (E120): Timing gear cover oil seal
Replacement
1. Remove engine under cover rh
2. Remove front wheel rh
3. Remove fan and generator v belt

- Turn the v–ribbed belt tensioner slowly clockwise and loosen it. Then, remove the fan and generator belt v and put back the v–ribbed belt tensioner little by little and fix it quietly.
4. Remove engine mounting insulator sub–assy rh
- Remove the the ps oil pump reservoir and put it aside.
- place a wooden block between the jack and engine, and set the jack. Then, remove the 4 bolts, the 2 nuts and engine mounting insulator rh.

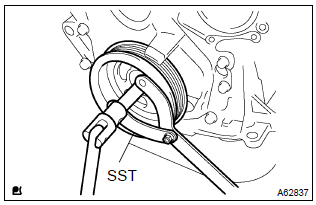
5. Remove crankshaft pulley
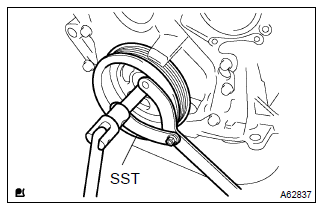
- Using sst, remove the crankshaft pulley bolt.
Sst 09960–10010 (09962–01000, 09963–01000)
- remove the crankshaft pulley from the crankshaft.
6. Remove timing gear cover oil seal
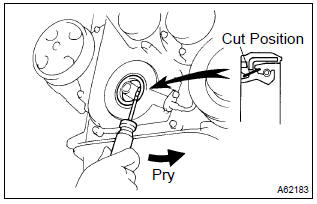
- Using a knife, cut off the oil seal lip.
- using a screwdriver with taping its tip, pry out the oil seal.
Notice
: after the removal, check if the crankshaft is not damaged.
If there is, mend it with a sandpaper (#400).
7. Install timing gear cover oil seal
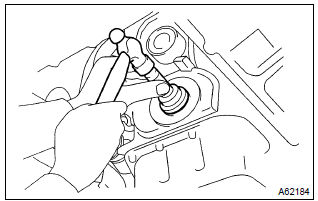
- Apply mp grease to a new oil seal lip.
Notice
: keep the lip off foreign materials.
- using sst, tap in the oil seal until its surface is flush with
the timing chain cover edge.
Sst 09223–22010
N
otice
: wipe off extra grease on the crankshaft.
8. Install crankshaft pulley
- Align the pulley set key with the key groove of the pulley, and slide on the pulley.
- using sst, install the crankshaft pulley bolt.
Sst 09960–10010 (09962–01000, 09963–01000) torque: 138 nvm (1,407 Kgf·cm, 102 ft·lbf)
9. Install engine mounting insulator sub–assy rh
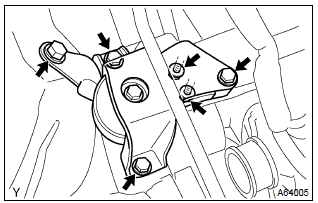
- Install the engine mounting insulator rh with the 4 bolts
and 2 nuts.
Torque: 52 nvm (530 Kgf·cm, 38 ft·lbf)
10. Install front wheel rh torque: 103 nvm (1050 Kgf·cm, 76 ft·lbf)
11. Check engine oil leak


Other materials:
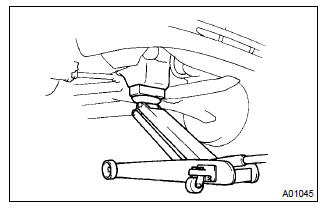
Location of the spare tire, jack and tools
1 Luggage floor cover
2 Wheel nut wrench
3 Jack handle
4 Jack attachment*
5 Jack
6 Spare tire
7 Tool tray
*: The jack attachment is used when raising your vehicle with a floor jack.
CAUTION
■Using the tire jack
Observe the following precautions.
Improper use of the tire jack may c ...
Inspection procedure
1 Check harness and connector(transmission control switch –
body ground)
Disconnect the transmission control switch connector of
shift lever assy.
measure the resistance according to the value(s) in the
table below.
Standard:
2 Inspect transmission control switch
M ...
Circuit description
Refer to dtc p0115
Dtc no.
Dtc detection condition
Trouble area
P0116
If engine coolant temperature (ect) was between 35 c (95 °F)
and 60 c (140 °F) when starting the engine, and also conditions
(a) and (b) are met:
vehicle has run with acceleration an ...