Toyota Corolla (E120) 2002–2008 Repair Manual / Emission control / Engine rear oil seal
Toyota Corolla (E120): Engine rear oil seal
Replacement
1. Remove manual transaxle assy (m/t transaxle)
2. Remove automatic transaxle assy (a/t transaxle)
3. Remove clutch cover assy (m/t transaxle)
- remove the 6 bolts and clutch cover.
4. Remove clutch disc assy (m/t transaxle)
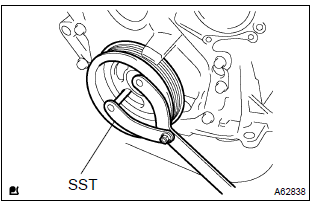
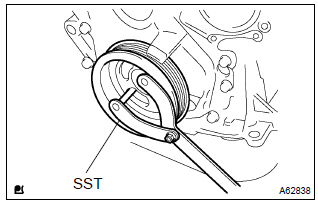
5. Remove flywheel sub–assy (m/t transaxle)
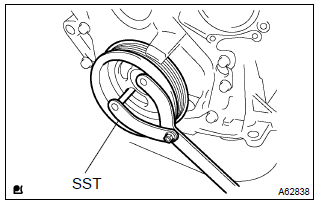
- Fix the crankshaft with sst, then remove the 8 bolts and
flywheel.
Sst 09960–10010 (09962–01000, 09963–01000)
6. Remove drive plate & ring gear sub–assy (a/t transaxle)
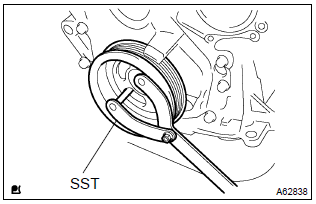
- Fix the crankshaft with sst, then remove the 8 bolts and
drive plate & ring gear.
Sst 09960–10010 (09962–01000, 09963–01000)
7. Remove engine rear oil seal
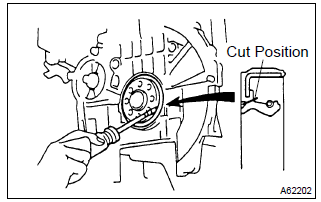
- Using a knife, cut off the oil seal lip.
- using a screwdriver with taping its tip, pry out the oil seal.
Notice
: after the removal, check if the crankshaft is not damaged.
If there is, mend it with a sandpaper (#400).
8. Install engine rear oil seal
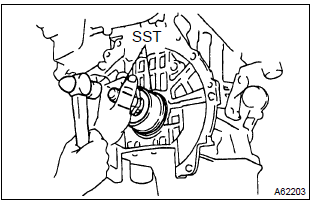
- Apply mp grease to a new oil seal lip.
Notice
: keep the lip off foreign materials.
- using sst, tap in the oil seal until its surface is flush with
the rear oil seal retainer edge.
Sst 09223–15020, 09950–70010 (09951–07100)
Notice
: wipe off extra grease on the crankshaft.
9. Install flywheel sub–assy (m/t transaxle)
- Fix the crankshaft with sst.
Sst 09960–10010 (09962–01000, 09963–01000)
- Clean the bolt and bolt hole.
- apply adhesive to the bolts.
Adhesive: part no. 09330–00070, Three bond or equivalent.
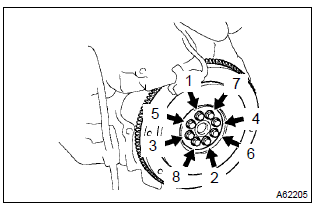
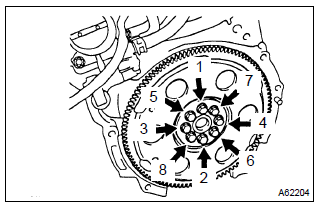
- install and uniformly tighten the 8 bolts, in several passes,
in the sequence shown.
Torque: 49 nvm (500 Kgf·cm, 36 ft·lbf)
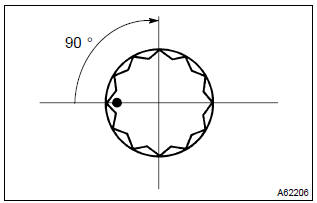
- Mark the bolts with paint.
- retighten the bolts by an additional 90 .
- check that the point marked bolts are moved at 90 angle.
10. Install clutch disc assy (m/t transaxle) sst 09301–00210
11. Install clutch cover assy (m/t transaxle)
12. Install drive plate & ring gear sub–assy (a/t transaxle)
- Fix the crankshaft with sst.
Sst 09960–10010 (09962–01000, 09963–01000)
- Clean the bolt and bolt hole.
- apply adhesive to the bolts.
Adhesive: part no. 09330–00070, Three bond or equivalent.
- install and uniformly tighten the 8 bolts, in several passes, in the sequence shown.
- fix the crankshaft with sst.
Torque: 88 nvm (897 Kgf·cm, 65 ft·lbf)
13. Install manual transaxle assy (m/t transaxle)
14. Install automatic transaxle assy (a/t transaxle)


Other materials:
Circuit description
The ecm compares the two waveforms of the heated oxygen sensors located
before and after the catalyst
to determine whether or not the catalyst performance has deteriorated.
Air–fuel ratio feedback compensation keeps the waveform of the heated oxygen
sensor in front of the catalyst
alterna ...
Replacement
Hint: components:
1. Precaution
2. Disconnect battery negative terminal
3. Remove horn button assy
Place the front wheels facing straight ahead.
using a torx socket wrench (t30), loosen the 2 torx
screws until the groove along the screw circumference
catches on the screw ca ...
No sound is heard from speaker in all modes
Wiring diagram
Inspection procedure
1 Check lcd (liquid crystal display) for lighting
Lcd illumination check
turn the ignition switch acc.
Turn the radio receiver assembly on.
Standard: lcd illumination of the radio receiver assembly light.
2 Control fader and ...