Toyota Corolla (E210) 2019-2026 Owners Manual / Driving / Using the driving support systems / Cruise control
Toyota Corolla (E210): Cruise control
The vehicle can be driven at a set speed even if the accelerator pedal is not depressed.
Use the cruise control only on highways and expressways.
WARNING
■For safe use
- Driving safely is solely the
responsibility of the driver.
Therefore, do not overly rely on this system. The driver is solely responsible for paying attention to the vehicle's surroundings and driving safely.
- Set the speed appropriately according to the speed limit, traffic flow, road conditions, weather conditions, etc. The driver is responsible for confirming the set speed.
■Situations in which cruise control should not be used
Do not use the cruise control in the following situations. As the system will not be able to provide appropriate control, using it may lead to an accident resulting in death or serious injury.
- On roads with sharp bends
- On winding roads
- On slippery roads, such as those covered with rain, ice or snow
- On steep downhills, or where there are sudden changes between sharp up and down gradients
Vehicle speed may exceed the set speed when driving down a steep hill.
- When it is necessary to disable the system.
System Components
■ Meter display

- Set vehicle speed
- Cruise control indicator
■ Switches
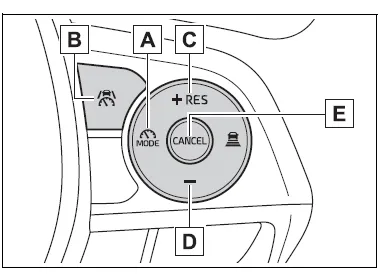
- Driving assist mode select switch
- Driving assist switch
- "+" switch / "RES" switch
- "-" switch
- Cancel switch
Using the cruise control
Setting the vehicle speed
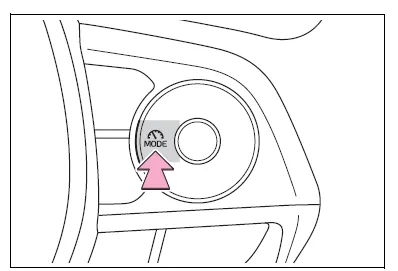
1. Press the driving assist mode select switch to select cruise control.
The cruise control indicator will illuminate.
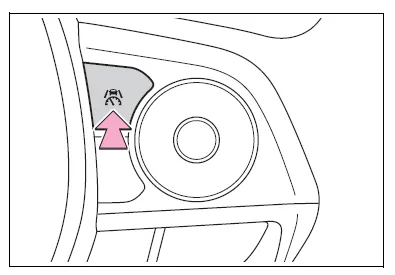
2. Using the accelerator pedal, accelerate to the desired vehicle speed (approximately 20 mph [30 km/h] or more), and press the driving assist switch to set the set vehicle speed.
The vehicle speed at the moment the switch is released will be the set vehicle speed.
Adjusting the set vehicle speed
■ Adjusting the set vehicle speed using the switches
To change the set vehicle speed, press the "+" or "-" switch until the desired speed is displayed.
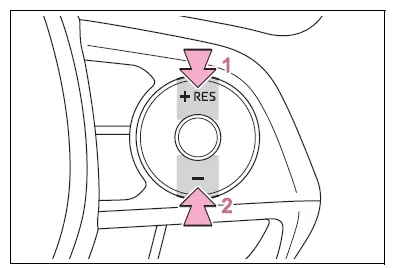
- Increase set vehicle speed
- Decrease set vehicle speed
The set vehicle speed will increase or decrease as follows:
Fine adjustment: By 1 mph (1.6 km/h) or 1 km/h (0.6 mph) each time the switch is pressed
Large adjustment: Increases continuously while the switch is pressed and held
■ Increasing the set vehicle speed using the accelerator pedal
1. Depress the accelerator pedal to accelerate the vehicle to the desired vehicle speed.
2. Press the "+" switch.
Canceling/resuming control
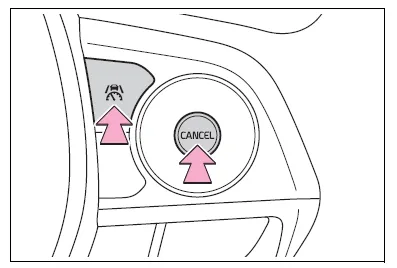
- Press the cancel switch or driving assist switch to cancel control.
Control will also be canceled if the brake pedal is depressed.
- Press the "RES" switch to resume control.
■Automatic cancellation of the cruise control
In the following situations, the cruise control will be canceled automatically:
- When the vehicle speed drops approximately 10 mph (16 km/h) or more below the set vehicle speed
- When the vehicle speed drops below approximately 20 mph (30 km/h)
- When the brake control or output restriction control of a driving support system operates (For example: PCS, drive-start control)
- When the parking brake has been operated
- Situations in which some or all of the functions of the system cannot operate


Other materials:
Inspection procedure
1 Check d squib circuit(airbag sensor assy center – horn button
assy)
Disconnect the negative (–) terminal cable from the battery,
and wait at least for 90 seconds.
disconnect the connectors between the airbag sensor
assy center and the horn button assy.
release the airbag activ ...
Registering a Bluetooth® audio player for the first time
To use the Bluetooth® Audio, it is necessary to register an audio player with
the system.
Once the player has been registered, it is possible to use the Bluetooth® Audio.
For details about registering a Bluetooth® device
1 Turn the Bluetooth® connection setting of your audio player on.
2 P ...
Child restraint system
fixed with a child restraint
LATCH anchor (except for
Puerto Rico)
■ Child restraint LATCH
anchors
LATCH anchors are provided for
the outboard rear seat. (Marks
displaying the location of the
anchors are attached to the
seats.)
■ When installing in the rear
outboard seats
Install the child restraint system
in accordance to the operation
manual enclosed with th ...