Toyota Corolla (E120) 2002–2008 Repair Manual / Fuel / Fuel tank assy / Removal & installation and disassembly & re
Toyota Corolla (E120): Removal & installation and disassembly & re
1. Remove bench type rear seat cushion assy (, 72–8)
2. Remove rear floor service hole cover
3. Work for preventing gasoline from spilling out
- start the engine.
- after the engine has stopped on the its own, turn the ignition switch to lock.
4. Disconnect fuel tank main tube sub–assy
5. Disconnect fuel emission tube sub–assy no.1
6. Remove fuel tank vent tube set plate
7. Remove fuel pump assembly
8. Remove fuel suction tube set gasket
9. Drain fuel
10. Remove floor panel brace front
- Remove the 2 nuts and floor panel brace front.
11. Remove exhaust pipe assy front
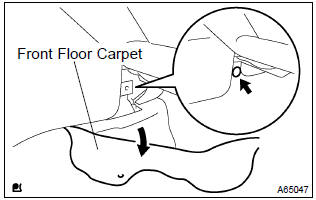
- Using a clip remover, remove the clip.
- tear off the front floor carpet.
- Disconnect the oxygen sensor connector.
- remove the 2 exhaust pipe supports.
- remove the 4 bolts, 4 compression springs and exhaust pipe.
12. Remove fuel tank protector no.1

- Remove the 5 bolts and fuel tank protector.
13. Separate parking brake cable assy no.2
- Remove the 2 installing bolts of the parking brake cable.
14. Separate parking brake cable assy no.3
- Remove the 2 installing bolts of the parking brake cable
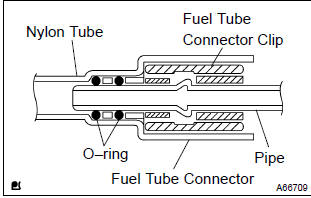
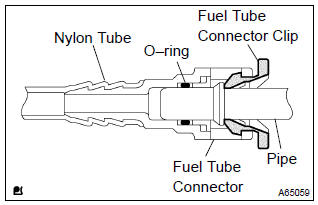
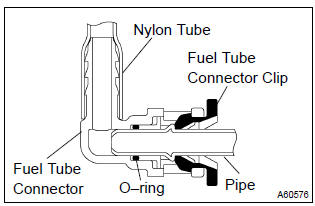
15. Disconnect fuel tank main tube sub–assy
- Pinch the fuel tube connector clip, and remove the fuel tube connector clip.
- pull out the fuel tank main tube.
Notice
:
- check if there is any dirt like mud around the fuel tube connector before this work and clean the dirt away.
- Be careful of dirt like mud because the fuel tube connector has an o–ring to seal the fuel tube connector and pipe.
- Do not use any tool in this work.
- Do not bend or twist the nylon tube by force.
- After disconnecting, cover the fuel tube connector with a vinyl bag.
- When the fuel tube connector and pipe are stuck, pinch the fuel tank main tube between fingers, and turn it carefully to free and then disconnect the fuel tank main tube.
16. Disconnect fuel tank inlet pipe fuel hose
- Disconnect the fuel tank inlet filler pipe hose from the fuel tank.
17. Disconnect fuel tank breather hose
- Disconnect the fuel tank breather hose from the fuel tank.
18. Disconnect fuel tank vent hose

- Disconnect the fuel tank bent hose from the charcoal canister.
- Push the connector deep inside.
- Pinch portion a.
- Pull out the connector.
19. Disconnect valve to fuel filler pipe hose
- Disconnect the valve to fuel filler pipe hose from the fuel tank inlet pipe.
20. Disconnect fuel emission tube sub–assy no.1
- Pinch the fuel tube connector clip and then pull out the fuel emission tube.
Notice
:
- check if there is any dirt like mud around the fuel tube connector before this work and clean the dirt away.
- Be careful of dirt like mud because the fuel tube connector has an o–ring to seal the fuel tube connector and pipe.
- Do not use any tool in this work.
- Do not bend or twist the nylon tube by force.
- After disconnecting, cover the fuel tube connector with a vinyl bag.
- When the fuel tube connector and pipe are stuck, pinch the fuel emission tube between fingers, and turn it carefully to free and then disconnect the fuel emission tube.
21. Remove fuel tank assy
- Set a mission jack to the fuel tank.
- remove the 4 bolts, 2 fuel tank bands and fuel tank.
22. Remove fuel tank main tube sub–assy
- Remove the fuel tank main tube from the fuel tube clamp and bracket
23. Remove fuel tube clamp no.4
- Remove the bolt and fuel tank clamp.
24. Remove fuel tube bracket
- Remove the fuel tube bracket from the fuel tank.
25. Remove fuel emission tube sub–assy no.1
- Pinch the fuel tube connector clip and then pull out the fuel emission tube.
Notice
:
- check if there is any dirt like mud around the fuel tube connector before this work and clean the dirt away.
- Be careful of dirt like mud because the fuel tube connector has an o–ring to seal the fuel tube connector and pipe.
- Do not use any tool in this work.
- Do not bend or twist the nylon tube by force.
- After disconnecting, cover the fuel tube connector with a vinyl bag.
- When the fuel tube connector and pipe are stuck, pinch the fuel emission tube between fingers, and turn it carefully to free and then disconnect the fuel emission tube.
26. Remove fuel tube clamp no.2
- Remove the fuel tube clamp from the fuel tank.
27. Remove check valve protector
- Using a screwdriver, unlock the claw, and remove the check valve protector by turning it counter clockwise.
28. Remove fuel tank inlet valve assy
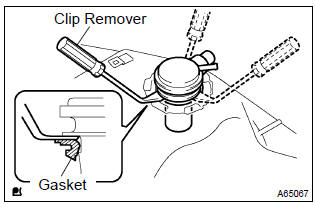
- Insert a clip remover between the fuel tank inlet valve and gasket, remove the fuel tank inlet valve by gradually pushing it upward.
Notice
:
- work accurately to maintain the sealing performance of the fuel tank inlet valve, since it is made from resin.
- It is easy to damage by removing and installing forcibly.
- Be sure to install a new fuel tank inlet valve and gasket.
29. Remove check valve gasket
- Remove the gasket from the fuel tank inlet valve.
30. Remove fuel tank cushion no.1
- Remove the 7 fuel tank cushions from the fuel tank.
31. Install fuel tank cushion no.1

- Install the 7 new fuel tank cushions to the fuel tank.
32. Install check valve gasket
- Install a new gasket to the fuel tank.
33. Install fuel tank inlet valve assy
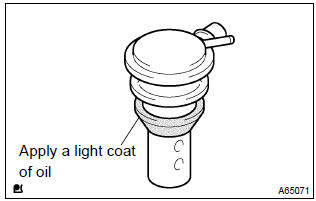
- Apply a light coat of oil around the fuel tank inlet valve as shown in the illustration, and insert it into the fuel tank without force.
Notice
: be careful not to drop the gasket into the fuel tank.
34. Install fuel emission tube sub–assy no.1
- Push in the fuel tube connector to the pipe until fuel tube connector makes ”click” sound.
Notice
:
- check if there is any damage or foreign objects on the connected part.
- After connecting, check if the fuel tube connector and pipe are securely connected by pulling them.
35. Install fuel tube clamp no.4
- Install the fuel tube clamp with the bolt.
Torque: 6.0 Nvm (61 kgfvcm, 53 in.Vlbf)
36. Install fuel tank assy
- Set a mission jack to the fuel tank.
- install the fuel tank and 2 fuel tank bands with the 4 bolts.
Torque: 39 nvm (400 kgfvcm, 29 ftvlbf)
37. Connect fuel emission tube sub–assy no.1
- Push in the fuel tube connector to the pipe until fuel tube connector makes ”click” sound.
Notice
:
- check if there is any damage or foreign objects on the connected part.
- After connecting, check if the fuel tube connector and pipe are securely connected by pulling them.
38. Connect fuel tank main tube sub–assy
- Push in the fuel tube connector to pipe until fuel tube connector, and install the fuel tube connector clip.
Notice
:
- check if there is any damage or foreign objects on the connected part.
- After connecting, check if the fuel tube connector and pipe are securely connected by pulling them.
39. Install parking brake cable assy no.3
- Install the parking brake cable with the 2 bolts.
Torque: 5.4 Nvm (55 kgfvcm, 48 in.Vlbf)
40. Install parking brake cable assy no.2
- Install the parking brake cable with the 2 bolts.
Torque: 5.4 Nvm (55 kgfvcm, 48 in.Vlbf)
41. Install fuel tank protector no.1
- Install the fuel tank protector with the 5 bolts.
Torque: 5.4 Nvm (55 kgfvcm, 48 in.Vlbf)
42. Install exhaust pipe assy front
- Using vernier calipers, measure the free length of the
compression spring.
Free length:
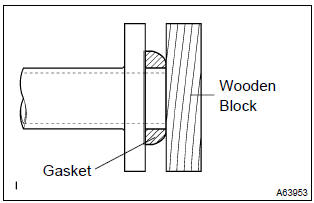
front side 43mm (1.6929 In.) Rear side 40mm (1.5748 In.) - using a hammer and wooden block, tap in a new gasket until its surface is flush with the exhaust manifold.
Notice
:
- tap in the gasket in the correct direction.
- Do not reuse the removed gasket.
- Be sure not to push in the gasket by installing the exhaust pipe.
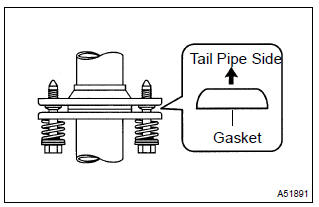
- Install a new gasket on the exhaust pipe (rear side).
- install the exhaust pipe with the 4 compression springs
and 4 bolts.
Torque: 43 nvm (440 kgfvcm, 32 ftvlbf)
- install the 2 exhaust pipe supports.
- connect the oxygen sensor connector.
- install the font floor carpet with a clip.
43. Install floor panel brace front
- Install the floor panel brace front with the 2 nuts.
Torque: 30 nvm (302 kgfvcm, 22 ftvlbf)
44. Install fuel suction tube set gasket
45. Install fuel pump assembly
46. Install fuel tank vent tube set plate
47. Connect fuel emission tube sub–assy no.1
48. Connect fuel tank main tube sub–assy
49. Check fuel leak
50. Check exhaust gas leak
51. Install rear floor service hole cover
52. Install bench type rear seat cushion assy


Other materials:
Pre–check
1. Diagnosis system
Release the parking brake lever.
check the warning lights.
When the ignition switch is turned on, check that the abs
warning light and brake warning light goes on for 3 sec.
Hint:
when the parking brake is applied or the level of the brake
fluid is low, the ...
Listing the registered cellular phones
Select “List Phone” using .
The list of registered cellular phones will be displayed.
● Connecting the registered cellular phone to the audio system
1 Select the name of the cellular phone to be connected using
.
2 Select “Select” using .
● Deleting a registered cell ...
Vehicle load limits
Vehicle load limits include total load capacity, seating capacity, towing
capacity and cargo capacity.
◆ Total load capacity (vehicle capacity weight):
Total load capacity means the combined weight of occupants, cargo and luggage.
◆ Seating capacity: 5 occupants (Front 2, Rear 3)
S ...