Toyota Corolla (E170): Rear seats
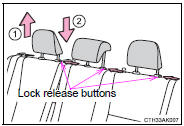
► Type A
1 Up
Pull the head restraints up.
2 Down
Push the head restraint down while pressing the lock release button.
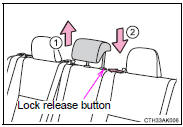
► Type B
1 Up
Pull the head restraints up.
2 Down
Push the head restraint down while pressing the lock release button.
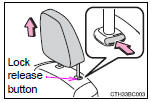
■Removing the head restraints (except for fixed rear head restraints)
Pull the head restraint up while pressing the lock release button.
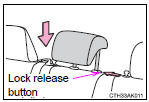
■Installing the head restraints (except for fixed rear head restraints) ►
Front seats and rear outside seats Align the head restraint with the installation holes and push it down to the lock position.
Press and hold the lock release button when lowering the head restraint.

►
Rear center seat
Align the head restraint with the installation holes and push it down to the lowest lock position while pressing the lock release button.
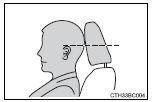
■Adjusting the height of the head restraints (except for fixed rear head restraints)
Make sure that the head restraints are adjusted so that the center of the head restraint is closest to the top of your ears.
■Adjusting the rear center seat head restraint
Always raise the head restraint one level from the stowed position when using.
CAUTION
■Head restraint precautions
Observe the following precautions regarding the head restraints. Failure to do so may result in death or serious injury.
●Use the head restraints designed for each respective seat.
●Adjust the head restraints to the correct position at all times.
●After adjusting the head restraints, push down on them and make sure they are locked in position.
●Do not drive with the head restraints removed.


Other materials:
Listening to a USB memory device
Connecting a USB memory device enables you to enjoy music from the vehicle
speakers.
Touch “USB” on the audio source selection screen.
Connecting a USB memory device
Audio control screen
Pressing the “AUDIO” button displays the audio control screen from any screens
of the selected so ...
Check dlc3
The vehicle’s ecm uses the iso 9141–2 for communication
protocol. The terminal arrangement of the dlc3 complies
with sae j1962 and matches the iso 9141–2 format.
Hint:
if the display shows unable to connect to vehicle
when you have connected the cable of the obd ii scan tool or
the h ...
Windshield wiper motor assy
Replacement
1. Remove windshield wiper arm cover
2. Remove fr wiper arm rh
operate the wiper and stop the windshield wiper motor assy at the
automatic stop position.
remove a nut and fr wiper arm rh.
3. Remove fr wiper arm lh
remove a nut and fr wiper arm lh.
4 ...