Toyota Corolla (E120): Problem symptoms table
Hint
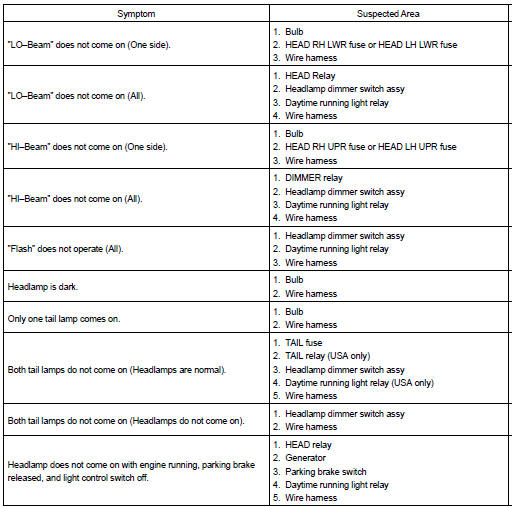
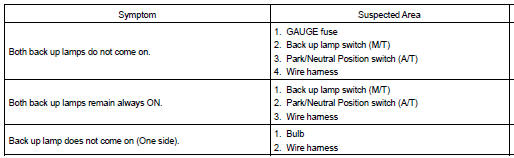
: use the table below to help determine the cause of the problem. The numbers indicate the priority of the likely cause of the problem. Check each part in order. If necessary, replace these parts.
1. Headlamp and tail lamp
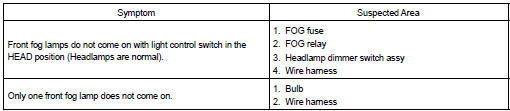
2. Front fog lamp system
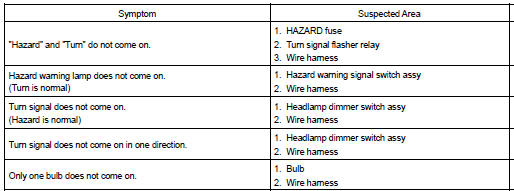
3. Turn signal and hazard warning system
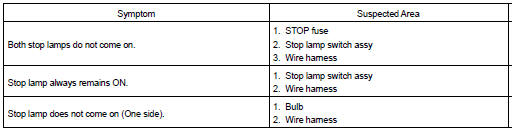
4. Stop lamp system
5. Back up lamp system
6. Interior lamp system

7. Light control rheostat system


Other materials:
Circuit description
Monitor description
The ecm commands gearshift by turning the shift solenoid valves ”on/off”.
When there is an open or short
circuit in any shift solenoid valve circuit, the ecm detects the problem and the
mil comes on. Illuminating
the mil, the ecm performs the fail–safe and turns ...
Back up lamp assy lh
Replacement
1. Remove back up lamp assy lh
Remove the service hole cover.
remove the 2 nuts and disconnect the connector.
Using a mouldingremover, remove the 2 clips and back
up light assy lh.
2. Install back up lamp assy lh
Set the 2 clips on the back up ligh ...
Replacement
Hint:
installation is in the reverse order of the removal. But the installation is
indicated only when it has a point.
1. Remove luggage compartment door cover
2. Remove rear spoiler
remove the 2 screws.
disconnect the wire harness connector.
put protective tape.
&nb ...