Toyota Corolla (E120): Replacement
Hint
: components:
1. Precaution
2. Disconnect battery negative terminal
3. Remove front door scuff plate rh
4. Remove rear door scuff plate rh
5. Remove front door opening trim rh
6. Remove rear door opening trim rh
7. Remove lap belt outer anchor cover
8. Remove center pillar garnish lower rh
9. Remove front seat outer belt assy rh
10. Remove side air bag sensor assy rh
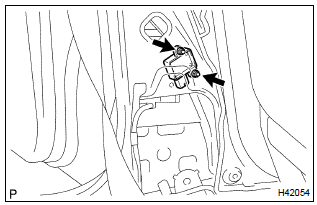
- Disconnect the connector from the side airbag sensor assy rh.
- remove the 2 nuts and side airbag sensor assy rh.
11. Inspect side air bag sensor assy rh
12. Install side air bag sensor assy rh
- install the 2 nuts and side airbag sensor assy rh.
Torque: 8.0 Nvm (82 kgfvcm, 71 invlbf)
- connect the side airbag sensor connector.
Notice
:
- installation of the connector is done with the sensor assembly installed. Make sure that the sensor assembly is installed to the specified torque.
- If the sensor assembly has been dropped, or there are cracks, dents or other defects in the case, bracket or connector, replace the sensor assembly with a new one.
- When installing the sensor assembly, take care that the srs wiring does not interfere with other parts and is not pinched between other parts.
- After installation, shake the sensor assembly to check that there is no looseness.
13. Install front seat outer belt assy rh
Torque:
upper bolt: 4.9 Nvm (50 kgfvcm, 43 in.Vlbf)
lower bolt: 41.2 Nvm (420 kgfvcm, 30 ftvlbf)
14. Inspect srs warning light


Other materials:
Inspection procedure
1 Input signal check
See input signal check on page 05–745.
check the indicator light operation when each of the set/
coast, resume/accel and cancel is turned on.
Ok:
set/coast, resume/accel switch:
the signals shown in the table on the left should be
output when each switch is ...
Fastening and releasing
the seat belt
To fasten the seat belt, push
the plate into the buckle until
a click sound is heard.
To release the seat belt,
press the release button A.
■Emergency locking retractor
(ELR)
The retractor will lock the belt during
a sudden stop or on impact. It may
also lock if you lean forward too
quickl ...
Circuit description
The srs warning light is located on the combination meter.
When the srs is normal, the srs warning light lights up for approx. 6 Seconds
after the ignition switch is
turned from the lock position to on position, and then turns off automatically.
If there is a malfunction is the srs, the srs ...