Toyota Corolla (E120): Overhaul
1. Remove bench type rear seat cushion assy
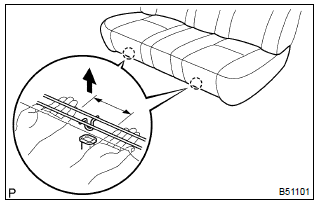
- Disengage the 2 clamps, and then remove the seat cushion.
2. Remove bench type rear seat back assy
- remove the headrests.
- remove the 2 bolts and seat back.
3. Remove bench type rear seat cushion cover
- remove the hog rings and seat cushion cover.
4. Remove bench type rear seat back cover
- remove the headrest supports.
- remove the hog rings and seat back cover.
5. Install bench type rear seat back cover
- cover the top of the seat back pad with the seat back cover.
- install the headrest supports.
- using hog ring pliers, fully install the seat back cover with new hog rings.
Notice
:
- be careful not to damage the cover.
- Be careful to prevent the cover wrinkles as little as possible.
6. Install bench type rear seat cushion cover
- using hog ring pliers, install the seat cushion cover with new hog rings.
Notice
:
- be careful not to damage the cover.
- Be careful to prevent the cover wrinkles as little as possible.
7. Install bench type rear seat back assy
- hook the seat back to the body.
- install the 2 bolts.
Torque: 7.8 Nvm (80 kgfvcm, 69 in.Vlbf)
8. Install bench type rear seat cushion assy
- insert the seat cushion under the seat back.
- engage the 2 clamps.


Other materials:
How to proceed with troubleshooting
1 Vehicle brought in
2 Customer problem analysis check and symptom check
3 Problem symptoms table
Without applicable symptoms, proceed to ”a”
with applicable symptoms, proceed to ”b”
4 Perform troubleshooting in the following method, depending on
malfunction symptom ...
Inspection procedure
Hint:
read freeze frame data using the hand-held tester or the obd ii scan tool.
Freeze frame data records the
engine conditions when a malfunction is detected. When troubleshooting, it is
useful for determining whether
the vehicle was running or stopped, the engine was warmed up or not, the ...
Cigarette lighter assy
Replacement
Hint: components:
1. Remove floor shift shift lever knob sub–assy (m/t transaxle)
2. Remove console panel upper
3. Remove cigarette lighter cover
Disengage the 2 claws and remove the cigarette lighter
cover.
4. Remove cigarette lighter assy
Turn the socket in ...