
Toyota Corolla (E120) 2002–2008 Repair Manual / Diagnostics / Sfi system / Mass or volume air flow circuit
range/performance problem / Circuit description
Toyota Corolla (E120): Circuit description
Refer to dtcs p0100
|
Dtc no. |
Dtc detection condition | Trouble area |
| P0101 | After engine is warmed up, conditions (a) to (d) continue for
more than 10 seconds (2 trip detection logic):
|
|
Conditions (a) and (b) continue for more than 6 seconds: (2 trip
detection logic)
|
Monitor description
The maf (mass air flow) sensor helps the ecm calculates the amount of air flowing through the throttle valve. The ecm uses this information to determine the fuel injection time and provides a proper air–fuel ratio.
Inside the maf sensor, there is a heated platinum wire exposed to the flow of intake air. By applying a specific current to the wire, the ecm heats this wire to a given temperature. The flow of incoming air cools the wire and an internal thermister, changing their resistance. To maintain a constant current value, the ecm varies the voltage applied to these components in the maf sensor. The voltage level is proportional to the air flow through the sensor and the ecm interprets this voltage as the intake air amount. If there is a defect in the sensor or an open or short circuit, the voltage level will deviate outside the normal operating range. The ecm interprets this deviation as a defect in the maf sensor and sets a dtc.
Example: if the voltage is more than 2.2 V at idle, or less than 0.4 V at idle off, the ecm interprets this as a defect in the maf sensor and sets a dtc.
Monitor strategy
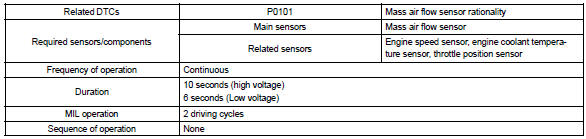
Typical enabling conditions
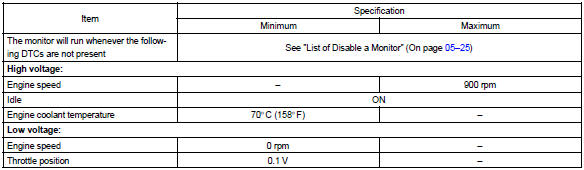
Typical malfunction thresholds

Wiring diagram
Refer to dtc p0100


Other materials:
Malfunction in fuel receiver gauge
Wiring diagram
Inspection procedere
1 Inspect fuel sender gage assy
Disconnect the connector fuel sender gauge.
check the float position between e and f and measure
the resistance between terminals 2 and 3 of the connector.
Check that the resistance value changes continuously.
S ...
Inspection procedure
1 Check p squib circuit(airbag sensor assy center – instrument
panel passenger airbag assy)
Disconnect the negative (–) terminal cable from the battery,
and wait at least for 90 seconds.
disconnect the connectors between the airbag sensor
assy center and the instrument panel ...
Replacement
Hint:
installation is in the reverse order of the removal. But the installation is
indicated only when it has a point.
1. Remove luggage compartment door cover
2. Remove rear spoiler
remove the 2 screws.
disconnect the wire harness connector.
put protective tape.
&nb ...