Toyota Corolla (E170) 2014–2019 Owners Manual / Driving / Operating the lights and wipers / Headlight switch / Operating instructions
Toyota Corolla (E170): Operating instructions
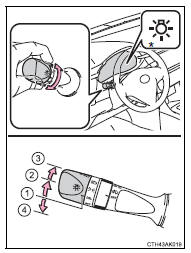
Turning the end of the lever turns on the lights as follows: ► Type A
1  The daytime running lights turn
on.
The daytime running lights turn
on.
2  The side marker, parking, tail,
license plate, daytime running lights and instrument panel lights turn on.
The side marker, parking, tail,
license plate, daytime running lights and instrument panel lights turn on.
3  The headlights and all the lights
listed above (except daytime running lights) turn on.
The headlights and all the lights
listed above (except daytime running lights) turn on.
4  The daytime running lights turn
off.
The daytime running lights turn
off.
*: Vehicles with a multi-information display
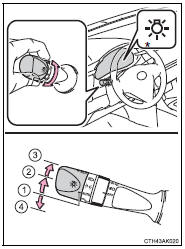
► Type B
1  The daytime running lights turn
on
The daytime running lights turn
on
2  The side marker, parking, tail,
license plate, daytime running lights and instrument panel lights turn on.
The side marker, parking, tail,
license plate, daytime running lights and instrument panel lights turn on.
3  The headlights and all the
lights listed above (except daytime running lights) turn on.
The headlights and all the
lights listed above (except daytime running lights) turn on.
*: Vehicles with a multi-information display

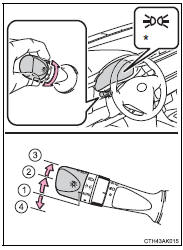
► Type C
1  The headlights and all the lights
listed below turn on and off automatically.
The headlights and all the lights
listed below turn on and off automatically.
(Vehicles without a smart key system: When the engine switch is in the “ON” position) (Vehicles with a smart key system: When the engine switch is in IGNITION ON mode)
2  The side marker, parking, tail,
license plate, daytime running lights and instrument panel lights turn on.
The side marker, parking, tail,
license plate, daytime running lights and instrument panel lights turn on.
3  The headlights and all the lights
listed above (except daytime running lights) turn on.
The headlights and all the lights
listed above (except daytime running lights) turn on.
4  The daytime running lights turn
off.
The daytime running lights turn
off.
*: Vehicles with a multi-information display
► Type D
1  The headlights and all the lights
listed below turn on and off automatically.
The headlights and all the lights
listed below turn on and off automatically.
(Vehicles without a smart key system: When the engine switch is in the “ON” position) (Vehicles with a smart key system: When the engine switch is in IGNITION ON mode)
2  The side marker, parking, tail,
license plate, daytime running lights and instrument panel lights turn on.
The side marker, parking, tail,
license plate, daytime running lights and instrument panel lights turn on.
3  The headlights and all the lights
listed above (except daytime running lights) turn on.
The headlights and all the lights
listed above (except daytime running lights) turn on.
4  The daytime running lights turn
on.
The daytime running lights turn
on.
*: Vehicles with a multi-information display


Other materials:
Replacement
1. Remove clutch start switch assy
disconnect the clutch start switch assy connector.
remove the nut and clutch start switch assy from the clutch pedal
support.
2. Install clutch start switch assy
install the clutch start switch assy with the nut.
Torque: 15.68 Nv ...
Dtc check/clear
Notice:
if there is no dtc in the normal mode, check the pending
fault code using the continuous test results
function (mode 7 for sae j1979) on the obd ii scan
tool or the hand–held tester.
Hand–held tester only:
when the diagnosis system is switched from the normal
mode to the ...
Torque converter clutch and drive plate (atm)
Inspection
1. Inspect torque converter clutch assy
Inspect the one–way clutch.
Set sst into the inner race of the one–way clutch.
Sst 09350–32014 (09351–32010)
set sst so that it fits in the notch of the converter
hub and outer race of the one–way clutch.
...