Toyota Corolla (E120): On–vehicle inspection
1. Inspect brake booster
- Airtightness check.
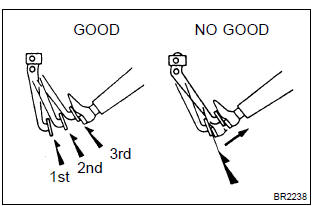
- Start the engine and stop it after 1 or 2 minutes. Depress
the brake pedal several times slowly.
Hint
: if the pedal goes down farthest at the 1st time, but gradually rises after the 2nd or 3rd time, the booster is airtight.
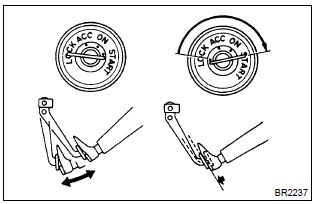
- Depress the brake pedal while the engine is running,
and stop the engine with the pedal depressed.
Hint
: if there is no change in the pedal reserve distance after holding the pedal for 30 seconds, the booster is airtight.
- Operating check.
- Depress the brake pedal several times with the ignition switch off and check that there is no change in the pedal reserve distance.
- Depress the brake pedal and start the engine.
Hint
: if the pedal goes down slightly, operation is normal.
2. Inspect vacuum check valve
- check vacuum check valve.
- Slide the clip and disconnect the vacuum hose.
- Remove the vacuum check valve.

- Check that there is ventilation from the booster to engine, and no ventilation from the engine to the booster.
- If any fault is found, replace the vacuum check valve.


Other materials:
Inspection procedure
Hint:
hand–held tester only:
narrowing down the trouble area is possible by performing ”a/f control” active
test (heated oxygen
sensor or other trouble areas can be distinguished). Perform active test using
hand–held tester (a/f
control).
Perform active test using the hand–held ...
Follow the correction procedures. (vehicles with a smart key system and with
a drive monitor display)
After taking the specified steps to correct the suspected problem, check that
the warning light turns off.
■SRS warning light
This warning light system monitors the airbag sensor assembly, front impact
sensors, side impact sensors (front door), side impact sensors (front), side impac ...
Floor shift cable transmission control shift
Replacement
Hint: components:
1. Remove air conditioner unit assy
Hint:
refer to the instructions for removal of the air conditioner unit assy.
2. Separate air bag sensor assy center
remove the 3 bolts, separate the airbag sensor assy center.
3. Remove exhaust pipe assy
4. Remo ...