Toyota Corolla (E120) 2002–2008 Repair Manual / Drive shaft / propeller shaft / Drive shaft, propeller shaft, axle / On–vehicle inspection
Toyota Corolla (E120): On–vehicle inspection
1. Inspect front axle hub bearing
- remove the front wheel.
- separate the front disc brake caliper assy .
- remove the front disc.
- inspect the bearing backlash.
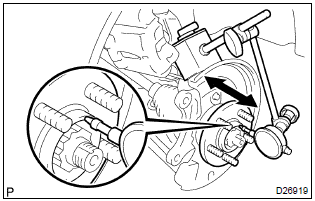
- Using a dial indicator, check the backlash near the
center of the axle hub.
Maximum: 0.05 Mm (0.0020 In.)
If the backlash exceeds the maximum, replace the front axle hub bearing.
- inspect the axle hub deviation.
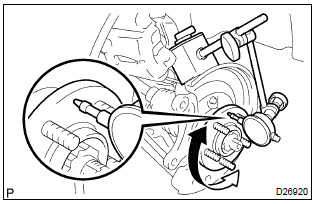
- Using a dial indicator, check the deviation at the surface
of the axle hub outside the hub bolt.
Maximum: 0.05 Mm (0.0020 In.)
If the backlash exceeds the maximum, replace the front axle hub sub–assy.
- install the front disc.
- install the front disc brake caliper assy .
- install the front wheel.
Torque: 103 nvm (1,050 Kgf·cm, 76 ft·lbf)
2. Inspect rear axle hub bearing
- remove the rear wheel.
- remove rear brake drum sub–assy.
- inspect the bearing backlash.
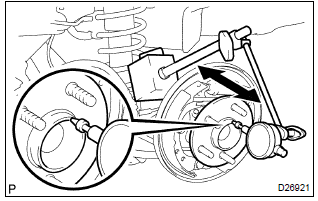
- Set a dial indicator near the center of the axle hub
and check the backlash in the bearing shaft sirection.
Maximum: 0.05 Mm (0.0020 In.)
If the backlash exceeds the maximum, replace the rear axle hub & bearing assy.
- Inspect the axle hub deviation.
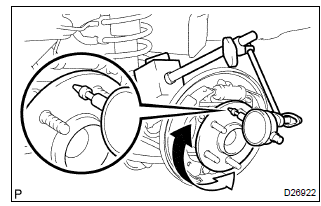
- Using a dial indicator, check the deviation at the surface
of the axle hub outside the hub bolt.
Maximum: 0.07 Mm (0.0028 In.)
If the backlash exceeds the maximum, replace the rear axle hub & bearing assy.
- install the rear brake drum sub–assy.
- install the rear wheel.
Torque: 103 nvm (1,050 Kgf·cm, 76 ft·lbf)


Other materials:
Replacement
1. Remove engine under cover rh
2. Remove cylinder head cover no.2
Remove the 2 screw, 3 clips and engine under cover.
3. Remove fan and generator v belt
Turn the v–ribbed belt tensioner slowly clockwise and
loosen it. Then, remove the fan and generator v belt and
put back ...
Inspection procedure
Hint:
read freeze frame data using the hand–held tester or the obd ii scan tool.
Freeze frame data records the
engine conditions when a malfunction is detected. When troubleshooting, it is
useful for determining whether
the vehicle was running or stopped, the engine was warmed up or not, th ...
Foamed material application areas
If an increase in temperature or other condition damages the foamed material
when repairing or replacing the panel,
fill in the insufficient areas with urethane foam. The following illustration
shows the areas for one side, but the
foamed material must be applied equally to both the left and r ...