
Toyota Corolla (E120) 2002–2008 Repair Manual / Lubrication / Oil filter sub–assy
Toyota Corolla (E120): Oil filter sub–assy
Replacement
Caution
:
- prolonged and repeated contact with mineral oil will result in the removal of natural fats from the skin, leading to dryness, irritation and dermatitis. In addition, used engine oil contains potentially harmful contaminants which may cause skin cancer.
- Exercise caution in order to minimize the length and frequency of contact of your skin to used oil. Wear protective clothing and gloves. Wash your skin thoroughly with soap and water, or use water–less hand cleaner to remove any used engine oil. Do not use gasoline, thinners, or solvents.
- In order to preserve the environment, used oil and used oil filter must be disposed of only at designated disposal sites.
1. Remove engine under cover rh
2. Drain engine oil
- remove the oil pan drain plug and drain the engine oil.
3. Remove oil filter sub–assy
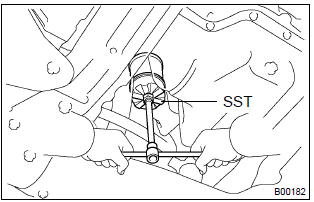
- Using sst, remove the oil filter sst 09228–06501
4. Install oil filter sub–assy
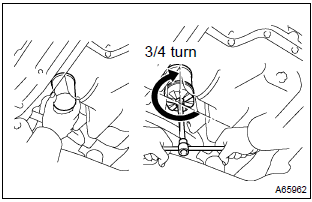
- Check and clean the oil filter installation surface.
- apply clean engine oil to the gasket of a new oil filter.
- lightly screw the oil filter into place, and tighten it until the gasket contacts the seat.
- using sst, tighten it an additional 3/4 turn.
Sst 09228–06501
5. Install oil pan drain plug
- Clean and install the oil pan drain plug with a new gasket.
Torque: 37 nvm (377 Kgf·cm, 27 in.Vlbf)
6. Add engine oil
Capacity:
drain and refill w/ oil filter change 3.7 Liters (3.9 Us qts, 3.3 Lmp. Qts)
drain and refill w/o oil filter change 3.5 Liters (3.7 Us qts, 3.1 Lmp. Qts)
dry fill 4.2 Liters (4.4 Us qts, 3.7 Lmp. Qts)
7. Inspect oil leak


Other materials:
Overhaul
Hint: components:
1. Drain manual transaxle oil (m/t transaxle)
torque: 39.2 Nvm (400 Kgf·cm, 29 ft·lbf)
2. Drain automatic transaxle fluid (a/t transaxle)
torque: 17.5 Nvm (178 Kgf·cm, 13 ft·lbf)
3. Remove front wheel
4. Remove engine under cover lh
5. Remove front axle hub lh nut
...
Wiring diagram
1 Inspect terminal voltage(pi)
(a) turn
Turn the ignition switch to on.
measure voltage between terminal 5 (pi) of cruise control
ecu assy and body ground, when the cruise control main
switch button is on and off.
Ok:
2 Inspect combination meter assy
3 Check harn ...
Adjustment
1. Put vehicle these conditions
tire inflation pressure is the specified value .
start the engine.
2. Adjust fog light aim
The fog light aim can be adjusting by moving the aiming
screw in the vertical direction.
Hint:
the optical aim moves upward when turning a scr ...